

If you’re on the hunt for a delicious way to fuel up that blends indulgence with nourishment, you’re going to want to try this Protein Peanut Butter Milkshake Recipe. I absolutely love how this turned out the first time I made it — creamy, rich peanut butter flavor combined with a satisfying protein boost that keeps me going long after. Plus, it’s made right in the Ninja Creami, so if you have one, you’re in for a treat that’s as fun to make as it is to drink. Stick with me, and I’ll walk you through everything so your next shake is just perfect.
Why You’ll Love This Recipe
- Creamy Texture: The oat milk and Ninja Creami magic create a smooth, thick shake without needing actual ice cream.
- Protein-Packed: This recipe sneaks in protein powder and peanut butter so it’s both tasty and filling.
- Customizable Sweetness: You control the maple syrup and chocolate syrup levels, so it’s guilt-free or indulgent as you like.
- Quick Prep: You only spend about 10 minutes prep time before freezing – super easy!

Ingredients You’ll Need
Every ingredient here works together to create that classic peanut butter milkshake vibe, but with a health-conscious twist. I love using oat milk because it’s naturally creamy, but I’ll share some swaps later that also work great!

- Oat Milk: Makes the shake creamy and dairy-free; also provides a smooth texture in the ice cream base and shake add-ins.
- Peanut Butter: Go for natural peanut butter with smooth or crunchy texture depending on your preference—it adds both flavor and protein.
- Maple Syrup: Natural sweetener that blends perfectly with peanut butter’s earthiness.
- Vanilla Extract: Just a teaspoon brightens the flavor and balances all the other ingredients.
- Vanilla Protein Powder: I recommend a high-quality whey or plant-based powder to boost your protein intake without overpowering the taste.
- Chocolate Syrup: Choose a lower sugar or sugar-free option to keep the shake healthy but still satisfy your chocolate cravings.
Variations
One of the things I love about this Protein Peanut Butter Milkshake Recipe is how easy it is to customize. Depending on your tastes or dietary needs, you can switch things up and still get great results.
- Swap Oat Milk for Soy Milk: I discovered this trick when I needed a higher protein boost—soy milk doesn’t compromise creaminess but adds extra nourishment.
- Add a Frozen Banana: If you want it thicker and with natural sweetness, frozen banana blends beautifully and makes it more smoothie-like.
- Use Peanut Butter Powder: For a lighter version, powdered peanut butter still delivers that peanut flavor with fewer calories and less fat.
- Dairy Version: If dairy isn’t an issue, swap oat milk for whole milk or half-and-half, and you’ll get an ultra-rich experience.
How to Make Protein Peanut Butter Milkshake Recipe
Step 1: Whisk Together the Ice Cream Base Ingredients
Start by mixing the oat milk, peanut butter, maple syrup, vanilla extract, and vanilla protein powder in a bowl until everything is smooth and fully combined. I like to use a whisk here because it breaks up any clumps in the protein powder. It’ll look like a rich, creamy batter — delicious already!
Step 2: Freeze the Mixture in the Ninja Creami Pint
Pour your mixture into the pint container that came with your Ninja Creami, leveling it out so it freezes evenly. Freeze it for 12 to 24 hours, depending on your schedule. I usually aim for the full 24 hours so the texture is perfect and scoopable.
Step 3: Add Milk and Chocolate Syrup — Then Spin!
After freezing, remove the lid and add the extra oat milk along with 2-3 tablespoons of your favorite chocolate syrup. Place the lid back on and spin it on the milkshake setting of your Ninja Creami. Once it’s done, give it a good stir and spin it again to get that ultra-creamy consistency. It will be thick but melts quickly into a thick milkshake texture that’s just heavenly.
Pro Tips for Making Protein Peanut Butter Milkshake Recipe
- Smooth Mixing: Always whisk the protein powder into the wet ingredients first to avoid clumps—that creamy texture depends on it!
- Freeze Time: Patience pays off—freezing the base overnight or longer gives you the best texture for spinning.
- Adjust Sweetness: Taste your base before freezing, and adjust maple syrup if you want it sweeter; chocolate syrup at the end adds extra fun.
- Storage Hack: Don’t skip letting leftovers sit at room temperature before re-spinning; it revives that fresh milkshake feel perfectly.
How to Serve Protein Peanut Butter Milkshake Recipe

Garnishes
I love topping this shake with a sprinkle of crushed peanuts or a drizzle of extra chocolate syrup for visual appeal and a little textural crunch. If you’re feeling extra, a dollop of whipped cream never disappoints—I’ve even added a pinch of cinnamon on occasion for a warm note that pairs well with peanut butter.
Side Dishes
Since this shake is pretty substantial on its own, I usually keep it simple with some fresh fruit on the side—apple slices or banana chunks are my go-to. But if you want a heartier snack, try pairing it with a small oat-based cookie or granola bar for some crunch and fuel.
Creative Ways to Present
For special occasions, I’ve poured this shake into tall glasses with a sugared rim (just dip the rim in chocolate syrup then crushed peanuts). Adding a fun reusable straw and a few mini peanut butter cups on the side makes it feel super festive and gourmet—you’ll impress any guests with minimal effort!
Make Ahead and Storage
Storing Leftovers
I like to store any leftover milkshake in the Ninja Creami pint container sealed tightly and popped back into the freezer. That way, it keeps fresh and you can enjoy a second round whenever you want. Just plan ahead — it’s best within a week.
Freezing
Freezing works beautifully with this recipe because the base is made to freeze hard before spinning. I’ve frozen leftovers for a few days before, and after thawing and re-spinning, it tastes just as good as freshly made. Perfect for batch prep!
Reheating
This isn’t a milkshake you reheat—instead, I recommend letting any frozen leftovers soften at room temperature for about 10-15 minutes, then add a tablespoon of milk and spin it again in the Ninja Creami. This quick step brings back the creamy milkshake consistency like magic.
FAQs
-
Can I make the Protein Peanut Butter Milkshake Recipe without a Ninja Creami?
You definitely can, though the texture will be different. If you don’t have a Ninja Creami, try blending the ingredients with some ice cubes in a high-speed blender until smooth and thick. It won’t be quite as dense and creamy as the Creami version, but still tasty and satisfying.
-
What protein powder works best for this recipe?
I’ve found that vanilla-flavored whey protein or plant-based powders like pea or brown rice protein work beautifully because they blend well and complement the peanut butter without any chalkiness. Choose a clean, mild-flavored protein for the best results.
-
Can I substitute peanut butter with other nut butters?
Absolutely! Almond butter or cashew butter are great alternatives, though it will slightly change the flavor profile. Make sure to use natural, unsweetened nut butters to keep the balance just right.
-
Is this recipe suitable for vegan diets?
Yes! Using oat milk and a plant-based vanilla protein powder keeps this recipe 100% vegan. Just double-check your chocolate syrup ingredients to avoid dairy or honey.
Final Thoughts
I used to struggle finding milkshakes that weren’t just empty calories, but this Protein Peanut Butter Milkshake Recipe changed the game for me. It’s creamy, satisfying, and packs a real protein punch so I feel good about indulgences like this. If you’ve got a Ninja Creami or even just a blender, give this recipe a shot — you’ll love how quick it is, and your taste buds will thank you. Trust me, your next snack or post-workout treat just got a major upgrade!
Print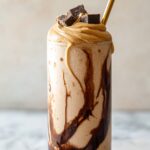
Protein Peanut Butter Milkshake Recipe
- Prep Time: 10 minutes
- Cook Time: 0 minutes
- Total Time: 12 hours 10 minutes
- Yield: 3 Servings
- Category: Beverage
- Method: Blending
- Cuisine: American
- Diet: Vegetarian
Description
This Ninja Creami Protein Milkshake recipe creates a creamy, nutritious treat packed with protein using oat milk, peanut butter, maple syrup, and vanilla protein powder. The ice cream base is prepared and frozen, then blended in the Ninja Creami to achieve a thick, indulgent milkshake consistency with chocolate syrup for extra flavor. Perfect for a quick, protein-rich dessert or snack.
Ingredients
Ice Cream Base
- 2 cups oat milk
- 1/4 cup peanut butter
- 1/4 cup maple syrup
- 1 teaspoon vanilla extract
- 1/4 cup vanilla protein powder
Milkshake Add-Ins
- 1/2 cup oat milk
- 2-3 tablespoons chocolate syrup (lower-sugar or sugar-free option recommended)
Instructions
- Mix Ice Cream Base: Whisk together oat milk, peanut butter, maple syrup, vanilla extract, and vanilla protein powder until smooth and well combined to form the ice cream base mixture.
- Freeze Mixture: Pour the blended mixture into a Ninja Creami pint container, secure the lid, and freeze for 12-24 hours to allow it to solidify properly.
- Add Milkshake Ingredients: Remove the lid from the frozen base, add the oat milk and chocolate syrup to the container.
- Spin on Milkshake Setting: Place the container into the Ninja Creami and process it using the milkshake setting to blend the ingredients into a thick, creamy milkshake.
- Stir and Respin: Remove the container from the machine, stir the milkshake gently, then respin on the milkshake setting to perfect the texture and consistency.
- Serve: The mixture will be thick but will quickly melt into a luscious milkshake consistency, ready to enjoy immediately.
Notes
- Tip: Substitute oat milk with soy milk for a creamier texture and higher protein content.
- Storage: Store any leftovers in a Ninja Creami pint container in the freezer for up to one week.
- Serving Suggestion: Let the milkshake sit at room temperature for 10-15 minutes before serving, add an extra tablespoon of milk, and respin to restore smoothness.
Nutrition
- Serving Size: 1 milkshake (approx. 1 cup)
- Calories: 280
- Sugar: 15g
- Sodium: 150mg
- Fat: 14g
- Saturated Fat: 2.5g
- Unsaturated Fat: 10g
- Trans Fat: 0g
- Carbohydrates: 28g
- Fiber: 4g
- Protein: 15g
- Cholesterol: 0mg

