

Oh, I just can’t get enough of this Pumpkin Magic Bars Recipe! It’s one of those recipes that feels like a warm hug—rich, cozy, and packed with layers of flavor that scream fall comfort. Whether you’re making these for a holiday gathering or sneaking a sweet bite with your afternoon coffee, you’ll find that every bite hits that perfect balance of buttery crust, creamy pumpkin, and gooey sweetness.
What makes this Pumpkin Magic Bars Recipe truly special is how simple it is yet how fancy it tastes. I first tried it when a friend brought it to a potluck, and I was hooked instantly. The mix of butterscotch chips, toffee, and pecans layered over pumpkin pie filling makes it a showstopper with zero fuss. Trust me, once you try this, it’ll become a go-to treat for your seasonal baking lineup.
Why You’ll Love This Recipe
- Layered Goodness: Each layer adds its own unique texture and flavor, making every bite exciting.
- Easy to Make: Despite looking impressive, it’s straightforward with no tricky techniques or special equipment.
- Perfect for Fall: The warm spices and pumpkin flavor evoke cozy autumn evenings and festive vibes.
- Crowd-Pleaser: My family and friends go crazy for this—it’s perfect for sharing at get-togethers.

Ingredients You’ll Need
The ingredients in this Pumpkin Magic Bars Recipe come together beautifully, blending buttery, sweet, and spiced elements into one delightful treat. I like to pick quality pecans and use fresh pumpkin pie filling—it makes a notable difference!
- Unsalted butter: It gives richness without adding extra saltiness, so you can control the flavors perfectly.
- Light brown sugar: The molasses flavor deepens the sweetness and adds moisture to the crust.
- All-purpose flour: The sturdy base needed for a buttery crust that holds up those layers.
- Pumpkin pie spice: The signature blend that brings warm, cozy autumn flavors.
- Sea salt: Just a pinch enhances all the flavors—it’s a small detail with a big impact.
- Pumpkin pie filling: The star ingredient; creamy, spiced, and smooth to complement the textured layers.
- Butterscotch chips: I love how these melt slightly, adding a luscious sweetness without overpowering pumpkin.
- Toffee bits: They add a fantastic crunchy caramel flavor, elevating the bars to another level.
- Chopped pecans: Toasted or raw, pecans give that nutty crunch that pairs so well with pumpkin.
- Sweetened condensed milk: This is the glue that binds all the layers with a rich, creamy finish.
Variations
I enjoy tweaking this Pumpkin Magic Bars Recipe depending on my mood or what I have on hand. Feel free to experiment with nuts, spices, or even add-ins like chocolate chips for a unique twist!
- Nut swaps: I’ve swapped pecans for walnuts or even mixed nuts, and it still tastes amazing—try what you love!
- Spice boost: Adding a little extra cinnamon or a splash of vanilla to the pumpkin layer gives a nice flavor kick.
- Chocolate chips: Sometimes I sneak in semi-sweet chocolate chips alongside the butterscotch—it’s my personal favorite.
- Dairy-free version: Use vegan butter and sweetened condensed coconut milk to make it suitable for dairy-free diets without sacrificing taste.
How to Make Pumpkin Magic Bars Recipe
Step 1: Create the Perfect Crust
First things first, preheat your oven to 350°F and line an 11×7 inch baking dish with foil—be sure to spray it well with cooking spray so your bars release easily later. Then, cream together your unsalted butter and light brown sugar for about two minutes until light and fluffy; this helps build a tender, slightly crisp crust. Next, stir in the flour, pumpkin pie spice, and sea salt, mixing just until combined—no overmixing here! Press the dough evenly into the bottom of your pan; I find using the bottom of a glass helps get an even, compact layer. Bake this crust for roughly 15 minutes until it’s lightly browned—you know it’s ready when it no longer looks raw and you can smell that sweet buttery aroma filling your kitchen.
Step 2: Layer the Pumpkin and Toppings
Once your crust is baked, spread that luscious pumpkin pie filling evenly over the warm crust—don’t fret if it feels a bit thick, that’s the magic taking shape! Next up, sprinkling on the butterscotch chips. I like to scatter these evenly so each bar gets a good sweet hit. Follow with a generous sprinkle of toffee bits; their crunchy caramel sweetness complements the pumpkin beautifully. Then, pile on the pecans, either raw or lightly toasted for extra nuttiness. Try to spread everything evenly so every bite combines all those fantastic layers!
Step 3: The Sweet Finish and Baking
The final touch is pouring the sweetened condensed milk slowly over the top—this creamy layer ties all the flavors and textures together as it bakes into a golden, sticky blanket. Bake your bars for 30 to 35 minutes until the top is nicely browned and bubbling around the edges. Let them cool completely in the pan before attempting to cut. Trust me, it’s tough, but patience pays off—the bars hold their shape much better once chilled.
Pro Tips for Making Pumpkin Magic Bars Recipe
- Use fresh pumpkin pie filling: It makes a huge difference compared to canned pumpkin puree and premixed spices.
- Press crust firmly: Don’t skimp on compacting your crust to avoid crumbly bars later.
- Cooling is key: Letting bars cool fully then chilling them makes cutting clean, neat bars much easier.
- Mix spice blends in advance: I blend my own pumpkin pie spice at home to ensure a fresh, vibrant taste every time.
How to Serve Pumpkin Magic Bars Recipe

Garnishes
I love just a simple dusting of powdered sugar or even a drizzle of caramel sauce right before serving—these add a little extra sparkle without stealing the spotlight from the bars themselves. Occasionally, I’ll dollop a little whipped cream or even a scoop of vanilla ice cream for a dessert party. It’s a quick way to elevate your serving game!
Side Dishes
If I’m serving these warm, I usually pair them with a hot cup of coffee or spiced tea—it’s such a cozy combo. For a party spread, they also go wonderfully with fresh fruit or even a creamy vanilla pudding to balance the sweetness.
Creative Ways to Present
Years ago, I tried cutting these bars into festive shapes using cookie cutters for a fall party—it was a hit! You can also layer them in a trifle dish with whipped cream and chopped nuts to turn them into an eye-catching layered dessert. Presentation makes these bars feel even more special, especially for the holidays.
Make Ahead and Storage
Storing Leftovers
Since these bars contain pumpkin, I’ve learned it’s best to store any leftovers in the refrigerator to keep them fresh and safe. I keep mine covered tightly with foil or in an airtight container. They last well for about 4-5 days, although honestly, they rarely hang around that long in my house!
Freezing
Sometimes I batch-make these bars for upcoming occasions and freeze them in airtight containers or wrapped tightly in plastic wrap and foil. Freezing works well and preserves flavor and texture. Just thaw overnight in the fridge before serving—super convenient when you want to impress without last-minute stress.
Reheating
If you want to warm them back up, I pop a piece in the microwave for about 10-15 seconds. That’s just enough to bring out that gooey magic without melting everything too much. You can also warm them gently in a low oven—just watch closely so they don’t dry out.
FAQs
-
Can I use canned pumpkin instead of pumpkin pie filling?
Yes, you can substitute canned pumpkin, but pumpkin pie filling is already sweetened and spiced, which adds more flavor and sweetness to the bars. If you use plain canned pumpkin, consider adding a bit of sugar and pumpkin pie spice to keep the balance right.
-
Do I have to refrigerate Pumpkin Magic Bars?
Because these bars contain pumpkin and sweetened condensed milk, refrigeration is important to keep them fresh and safe to eat. Chill them after baking and keep leftovers covered in the fridge for up to 5 days.
-
Can I make Pumpkin Magic Bars ahead of time?
Absolutely! These bars actually taste better the next day once all the flavors meld. You can bake them a day or two in advance, store in the fridge, and slice them just before serving.
-
What kind of pan is best for baking these bars?
An 11×7-inch baking dish lined with foil and sprayed with cooking spray works best for easy removal and even baking. Using foil also helps lift the bars out of the pan easily once cooled.
Final Thoughts
This Pumpkin Magic Bars Recipe truly holds a special place in my kitchen repertoire. It’s one of those recipes that looks impressive but really isn’t complicated, making it perfect for bakers at any level. When you make these, you’re not just baking a treat—you’re creating little moments of joy layered with nostalgia and sweetness. Give it a try, and I promise you’ll be reaching for this recipe again and again, just like I do every fall.
Print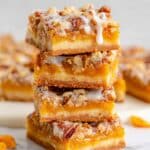
Pumpkin Magic Bars Recipe
- Prep Time: 10 minutes
- Cook Time: 50 minutes
- Total Time: 1 hour 30 minutes
- Yield: 16 bars
- Category: Dessert
- Method: Baking
- Cuisine: American
Description
Delight in the seasonal flavors with these Pumpkin Magic Bars featuring a buttery crust, layers of pumpkin pie filling, butterscotch chips, toffee bits, and pecans, all baked to golden perfection and finished with sweetened condensed milk for a rich, indulgent treat perfect for fall gatherings and dessert tables.
Ingredients
Crust
- 1/2 cup unsalted butter
- 1/3 cup light brown sugar, packed
- 1 cup all-purpose flour
- 1/2 teaspoon pumpkin pie spice (or pumpkin pie filling)
- Pinch of fine sea salt
Pumpkin Magic Bar Layers
- 1 cup pumpkin pie filling
- 11 ounces butterscotch chips
- 1 cup toffee bits
- 2 cups chopped pecans
- 14 ounces sweetened condensed milk
Pumpkin Pie Spice
- 2 teaspoons ground cinnamon
- 1/8 teaspoon nutmeg
- 1/4 teaspoon ground ginger
- 1/4 teaspoon ground cloves
- 1/2 teaspoon ground allspice
Instructions
- Preheat and prepare: Preheat your oven to 350°F (175°C). Line an 11×7 inch baking dish with foil and spray it with cooking spray. This will help in easy removal of the bars later and prevent sticking.
- Make the crust: In a large bowl, cream together the unsalted butter and light brown sugar until the mixture becomes light and fluffy, which should take about 2 minutes. Then add the all-purpose flour, pumpkin pie spice, and a pinch of sea salt, mixing until fully combined with no dry spots. Press this mixture firmly into the bottom of the prepared baking dish to form an even crust layer.
- Bake the crust: Bake the crust in the preheated oven for 15 minutes or until the edges start to turn lightly golden and the crust no longer looks raw.
- Add pumpkin layer: Remove the crust from the oven and evenly spread 1 cup of pumpkin pie filling over the baked crust.
- Layer toppings: On top of the pumpkin layer, scatter the butterscotch chips first, followed by the toffee bits and then the chopped pecans, ensuring an even distribution.
- Add sweetened condensed milk: Finally, pour the 14 ounces of sweetened condensed milk evenly over all the layered ingredients to bind them together during baking.
- Bake the assembled bars: Place the dish back into the oven and bake for an additional 30 to 35 minutes, or until the top is golden brown and bubbly.
- Cool and chill: Allow the bars to cool completely in the pan on a wire rack. Once cooled, transfer the bars to the refrigerator for chilling before slicing. This cooling and chilling process helps the bars set solid for clean cuts and enhanced flavor melding.
- Store and serve: Keep the bars refrigerated until ready to serve. These bars are best enjoyed chilled and stored in an airtight container for freshness.
Notes
- Because of the pumpkin in the recipe, these bars should always be stored in the refrigerator to maintain freshness and prevent spoilage.
- The pumpkin pie spice blend listed produces more than required for the crust; store any leftovers in an airtight container for future pumpkin recipes.
- For enhanced pumpkin flavor, you can add an additional 1/2 teaspoon of pumpkin pie spice directly into the pumpkin puree before layering.
Nutrition
- Serving Size: 1 bar (approximate)
- Calories: 320 kcal
- Sugar: 28 g
- Sodium: 110 mg
- Fat: 18 g
- Saturated Fat: 8 g
- Unsaturated Fat: 9 g
- Trans Fat: 0 g
- Carbohydrates: 39 g
- Fiber: 2 g
- Protein: 4 g
- Cholesterol: 35 mg

