

If you’re looking for a cookie that’s both stunning and delicious, you’ve got to try this Red Velvet Rose Cookies Recipe. I absolutely love how these delicate rosettes come out — they’re soft, slightly chocolatey, beautifully red, and perfect for any special occasion or just a cozy afternoon treat. Trust me, once you try piping these cute cookie roses, you’ll be hooked, and your friends will ask how you made something so pretty and tasty so effortlessly!
Why You’ll Love This Recipe
- Eye-Catching Design: The rosette shape makes these cookies almost too pretty to eat.
- Soft & Moist Texture: Thanks to the perfect balance of buttermilk and cocoa, they’re tender and melt in your mouth.
- Simple Ingredients: You likely have most of these in your pantry already, making it a quick bake whenever you crave something special.
- Versatile & Fun to Customize: You can easily dress them up with fillings or keep them plain for a beautiful, classic red velvet flavor.

Ingredients You’ll Need
Each ingredient plays its part in creating that luscious red velvet taste and the delicate rose shape. When you pick your ingredients, going for quality really shines through, especially with the cocoa and buttermilk.

- Shortening: Gives the cookies a tender texture and helps the rosettes hold their shape better than butter.
- White sugar: Sweetens the dough but also helps create that slight crisp edge.
- Eggs: Bind everything together while giving the dough a bit of lift and softness.
- Vanilla extract: Adds subtle warmth and enhances all the other flavors.
- Buttermilk: Brings a slight tang and reacts with the cocoa to keep cookies moist and tender.
- Red gel food coloring: This is what gives the cookies that iconic deep red hue without watering down the dough.
- All-purpose flour: The base of your cookie structure.
- Unsweetened cocoa powder: Provides that classic red velvet hint of chocolate flavor.
- Salt: Just a pinch to balance the sweetness and brighten the other flavors.
Variations
This Red Velvet Rose Cookies Recipe is a fantastic base that I love tweaking depending on the occasion or mood. Don’t be shy about making it your own — that’s part of the fun!
- Marshmallow Buttercream Filling: My family goes crazy for sandwiching these rosettes with marshmallow buttercream, adding a fluffy, sweet layer that melts perfectly.
- White Chocolate Drizzle: Try a quick white chocolate drizzle across the top for a fancy look and a delicious contrast to the cocoa.
- Vegan Adaptation: I once swapped shortening for coconut oil and used a flax egg — it worked surprisingly well, though the texture was a little softer.
- No-Piping Option: If you’re not confident with a piping bag, you can drop small spoonfuls and gently swirl with a toothpick to mimic the rose shape.
How to Make Red Velvet Rose Cookies Recipe
Step 1: Cream the Shortening and Sugar
Begin by preheating your oven to 350°F (175°C). In your stand mixer, beat together the shortening and sugar until the mixture is light and fluffy. This usually takes around 3-4 minutes. I learned that this step is crucial—not only does it create a tender crumb, but it also helps your rosettes keep their delicate shape when piping.
Step 2: Add Eggs, Vanilla, Buttermilk, and Red Food Coloring
Turn your mixer to medium-low speed and add eggs one at a time, mixing until just combined after each addition. Then, switch the mixer to low and pour in the vanilla, buttermilk, and red gel food coloring. The gel color is important because it provides rich color without thinning your dough like liquid food coloring can. If you don’t have gel, just add the liquid very slowly to avoid overly wet dough.
Step 3: Combine Dry Ingredients and Incorporate into Wet
In a separate bowl, whisk together the all-purpose flour, cocoa powder, and salt. Keeping the mixer on low, gradually add the dry ingredients to the wet mixture. Mix just until everything starts to come together—don’t overmix or your cookies could turn out tough. If the dough feels dry or crumbly, add a bit more buttermilk, no more than 1/4 cup extra. I usually add this incrementally because too much buttermilk will make piping tricky.
Step 4: Pipe Your Rose Cookies
Fit a piping bag with a 1M or 2D star tip and fill it with a small amount of dough. Practice on a piece of parchment paper to get the hang of swirling a rosette shape: start in the center and pipe a tight spiral moving outward. I find it easiest to pipe small, individual rosettes spaced evenly on a parchment-lined baking sheet. Don’t worry if they’re not perfect — that homemade look is part of the charm!
Step 5: Bake and Cool
Bake your cookies for 6 to 8 minutes. The trick here is not to overbake; the cookies will still look a bit wet when they come out, and that’s totally fine. It means they’re soft and tender inside. Let them cool completely on the baking sheet or a wire rack before handling. When cool, they’ll firm up just enough for you to sandwich or serve as is.
Step 6: Optional – Assemble Cookie Sandwiches
If you’re feeling fancy (or your guests deserve it!), spread about a tablespoon of marshmallow buttercream on the bottom of one cookie, then top with another to form a gorgeous sandwich. They’re irresistible like this — plus, they hold together nicely for gifting or parties.
Pro Tips for Making Red Velvet Rose Cookies Recipe
- Gel Food Coloring Over Liquid: I discovered this trick when my first batch was too runny—gel keeps dough thick and colors vibrant.
- Practice Piping: Swirling those rosettes perfectly takes a few tries, but once you get it, it feels really satisfying and looks great.
- Don’t Overbake: Cookies will look wet when done—this is key to softness, so resist the urge to keep baking.
- Prevent Sticky Dough: If your dough is too sticky to pipe, chilling it briefly helps—it firms up perfectly for shaping.
How to Serve Red Velvet Rose Cookies Recipe

Garnishes
I actually like to keep these simple, letting the cookies shine on their own. Sometimes I dust a little powdered sugar or add a tiny sprinkle of edible glitter for a special touch. If you’re serving for Valentine’s Day or weddings, edible rose petals are a showstopper and totally on theme.
Side Dishes
These cookies pair beautifully with a cup of strong coffee or a creamy latte. For a tea party vibe, I serve them alongside an Earl Grey or vanilla chai. If you want to get really decadent, a small scoop of vanilla ice cream topped with fresh berries complements their richness perfectly.
Creative Ways to Present
One fancy idea I’ve used is placing the cookie sandwiches in mini cupcake liners arranged on a tiered tray for a bridal shower. Also, you can stack them in clear boxes with a red ribbon for adorable gifts. Another time, I piped a little extra cream cheese frosting in the center and topped them with a fresh raspberry for extra color and flavor contrast.
Make Ahead and Storage
Storing Leftovers
I store leftover cookies in an airtight container at room temperature, separating layers with parchment paper to keep those delicate rosettes intact. They usually stay fresh and soft for up to 3 days, though I rarely have leftovers that long!
Freezing
Freezing these cookies is a lifesaver when you want to prep ahead. I freeze the piped rosettes on the baking sheet first, then transfer them to a zip-top bag or airtight container once firm. When I’m ready to bake, I pop them straight into the oven, just adding a minute or two to the baking time.
Reheating
To freshen up the cookies, I gently warm them in a low oven (about 300°F) for 3-4 minutes – this brings back that freshly baked softness without drying them out. Avoid microwaving to keep the rosette shape intact.
FAQs
-
Can I use butter instead of shortening in this Red Velvet Rose Cookies Recipe?
Butter can change the texture and make the dough spread more during baking, which can affect the rose shape. Shortening helps the cookies hold their delicate piping form better. If you want to try butter, consider chilling the dough before piping to reduce spreading.
-
What if I don’t have buttermilk on hand?
You can make a quick substitute by adding 1 tablespoon of lemon juice or white vinegar to 1/4 cup of milk. Let it sit for 5 minutes before using it in the recipe. This mimics the acidity of buttermilk, helping to tenderize the cookies and enhance flavor.
-
How do I avoid the cookies spreading too much during baking?
Make sure your dough isn’t too wet—stick to the measurement limits of buttermilk, and if it feels too loose, add a tablespoon more flour instead. Also, don’t overmix the dough and be careful not to overbake. Chilling the dough briefly before piping can also help keep shapes crisp.
-
Can I make these cookies ahead of time?
Absolutely! You can pipe the dough and freeze the unbaked rosettes, then bake fresh when needed. Or, bake the cookies and assemble with filling a day ahead—just store sandwiches in an airtight container to keep them fresh.
Final Thoughts
This Red Velvet Rose Cookies Recipe has quickly become one of my favorite bakes to impress without the stress. I love how the simple ingredients come together to form something that looks stunning but tastes even better. Whether you’re making these for a special event or just because, I promise you’ll enjoy every step — and every bite. Give it a try, and don’t forget to have fun with the piping; it’s the little things that make baking memorable!
Print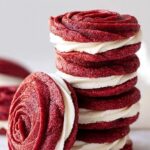
Red Velvet Rose Cookies Recipe
- Prep Time: 10 minutes
- Cook Time: 8 minutes
- Total Time: 18 minutes
- Yield: 8 servings
- Category: Dessert
- Method: Baking
- Cuisine: American
Description
Delight in these charming Red Velvet Rose Cookies, featuring tender red velvet-flavored dough piped into elegant rosettes and baked to perfection. These delicate cookies are sandwiched with a luscious marshmallow buttercream for a sweet, creamy finish. Perfect for special occasions or whenever you want a beautifully simple treat.
Ingredients
Cookie Dough
- 2/3 cup shortening
- 1 3/4 cups white sugar
- 2 eggs
- 1 tsp vanilla extract
- 1/4 cup buttermilk (plus up to 1/4 cup more if needed)
- 1 tsp red gel food coloring
- 2 cups all-purpose flour
- 1/2 cup unsweetened cocoa powder
- 1/2 tsp salt
Filling
- About 1 tbsp marshmallow buttercream per sandwich
Instructions
- Preheat Oven: Preheat your oven to 350 degrees Fahrenheit to prepare for baking the cookies.
- Cream Shortening and Sugar: In a stand mixer, cream together the shortening and sugar until fully combined and smooth.
- Add Eggs: Add eggs one at a time to the mixer on medium low speed, ensuring each is fully incorporated before adding the next.
- Mix Wet Ingredients: Lower the mixer speed to low, then add vanilla extract, buttermilk, and red gel food coloring, blending until evenly mixed.
- Combine Dry Ingredients: In a separate bowl, whisk together the all-purpose flour, unsweetened cocoa powder, and salt until well blended.
- Incorporate Dry Into Wet: With the mixer on low speed, gradually add the dry ingredient mixture into the wet ingredients. If the dough is still dry, add up to 1/4 cup more buttermilk, but no more than that.
- Pipe Rosettes: Fill a piping bag fitted with a 1M or 2D tip with small amounts of dough. Pipe individual rosettes onto a parchment-lined baking sheet, spacing them evenly.
- Bake Cookies: Bake the rosettes in the preheated oven for 6-8 minutes. The cookies will look slightly wet when done; this is normal.
- Cool: Allow the cookies to cool completely to room temperature on the baking sheet.
- Assemble Sandwiches: Spread about 1 tablespoon of marshmallow buttercream on the bottom of one cookie, then gently press another cookie on top to form a sandwich.
Notes
- Do not add more than 1/4 cup additional buttermilk to avoid overly wet dough.
- The cookies will look slightly wet when they come out of the oven; allow cooling to set the texture.
- If you don’t have a piping bag, use a plastic sandwich bag with the tip cut off as a substitute.
- Store cookie sandwiches in an airtight container at room temperature for up to 3 days.
- For a more intense red color, adjust the amount of gel food coloring as preferred.
Nutrition
- Serving Size: 1 cookie sandwich
- Calories: 250
- Sugar: 18g
- Sodium: 85mg
- Fat: 12g
- Saturated Fat: 4g
- Unsaturated Fat: 7g
- Trans Fat: 0g
- Carbohydrates: 30g
- Fiber: 2g
- Protein: 2g
- Cholesterol: 30mg
