
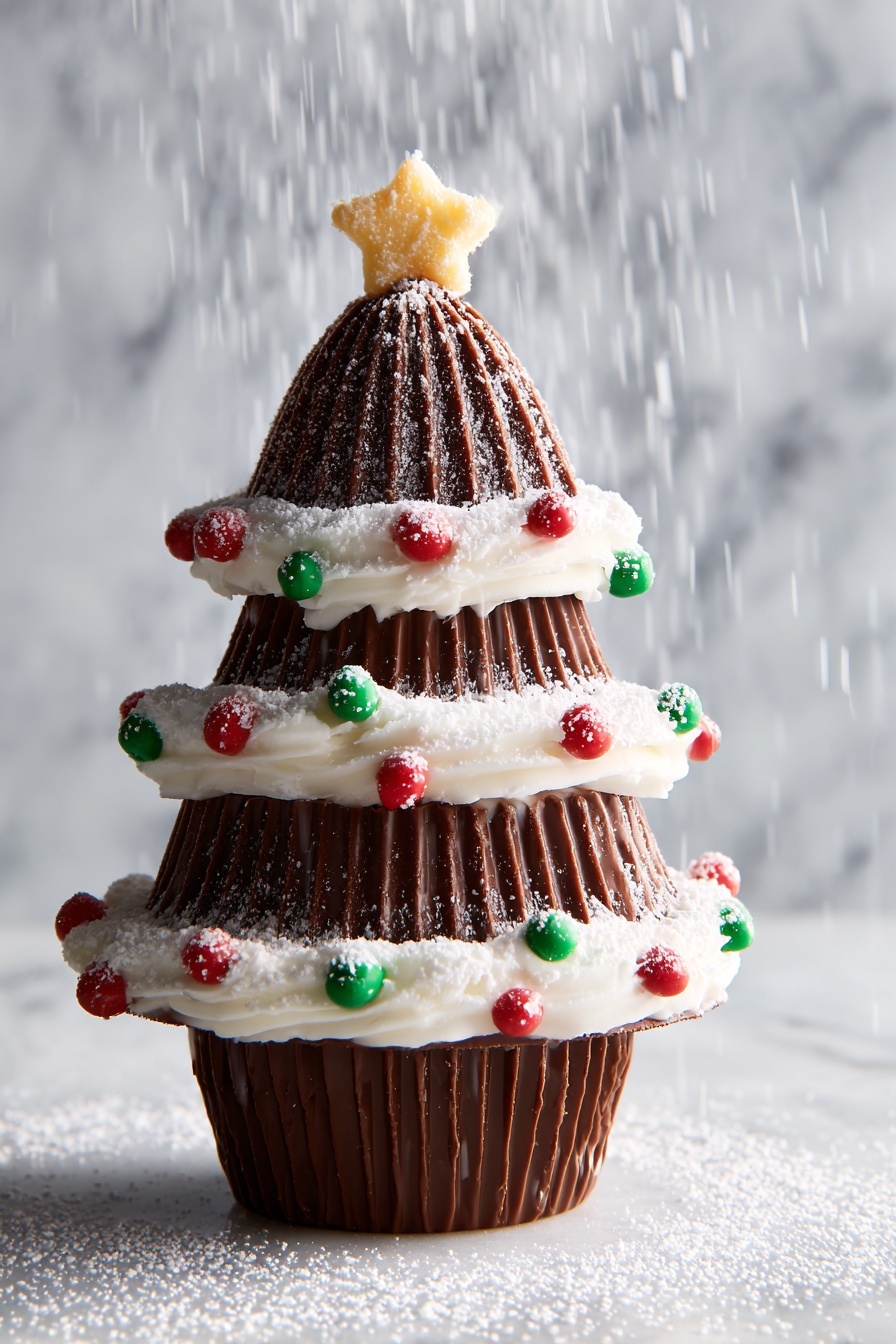
If you’re looking for a festive, easy-to-make sweet treat that will wow your friends and family, you’ve got to try this Reese’s Christmas Tree Treats Recipe. I absolutely love how these little chocolate trees come together so quickly but look seriously impressive on any holiday dessert table. You’ll find that with minimal ingredients and simple steps, you can create a fun, nostalgic dessert that’s perfect for both kids and adults alike.
Why You’ll Love This Recipe
- Super Simple: You only need a handful of ingredients and no fancy skills to create these adorable trees.
- Kid-Friendly Fun: I love getting my kids involved in decorating — it makes the holiday magic even sweeter.
- Make-Ahead Friendly: These treats hold up well, so you can prep them early and impress guests stress-free.
- Unique Presentation: This Reese’s Christmas Tree Treats Recipe turns classic candy into festive holiday showstoppers.

Ingredients You’ll Need
The magic here lies in combining your favorite Reese’s chocolates with some melting chocolate and festive decorations. The simplicity of the ingredients is perfect for last-minute holiday crafting, and you don’t have to rush out for anything unusual.
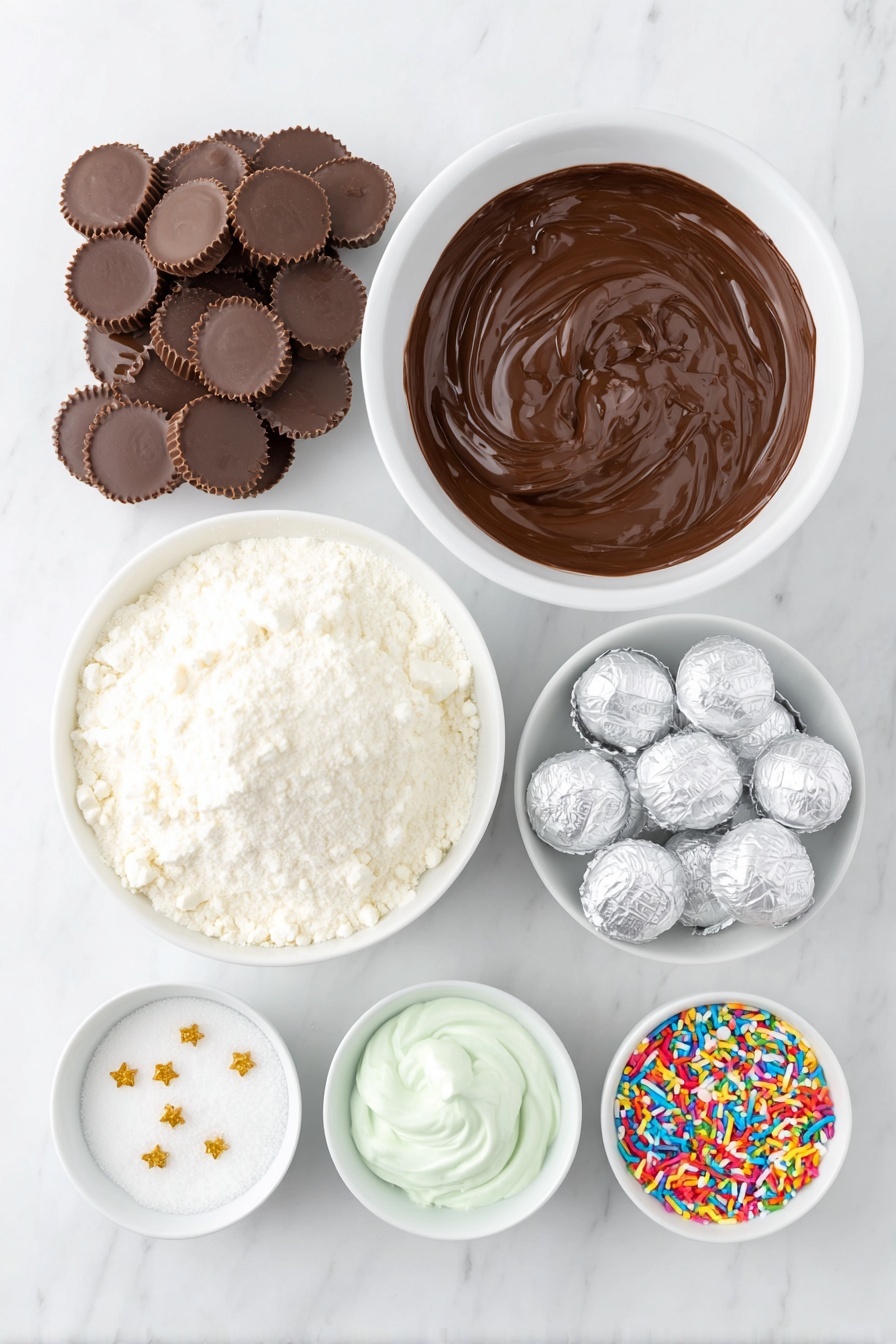
- Chocolate chips: Melted chocolate acts like edible glue here; I like semi-sweet for balance, but milk chocolate works too.
- Mini Reese’s cups: These form the base and parts of the tree — look for mini sizes to stack just right.
- Regular-size Reese’s cups: These are the main “tree” layers; stacking one upside down gives great stability and shape.
- Hershey kisses: The perfect pointed tree topper that’s both tasty and charming.
- White and green decorating icing: For piping garlands and adding fun personality—don’t skip the colors if you want that festive look.
- Sprinkles and gold stars: Tiny touches that make these trees truly festive—my kids love choosing their favorite sprinkle combos.
- Confectioners’ sugar (optional): A light dusting mimics fresh snow and adds nice extra sweetness if you like.
Variations
I always encourage you to put your own spin on the Reese’s Christmas Tree Treats Recipe. Whether you’re into different decorations or tweaking chocolate types, there’s tons of room for fun variations that keep things fresh and personalized.
- Nutty Delight: Try adding small chopped nuts or crushed pretzels between layers for a crunchy surprise — my family is obsessed with this twist!
- Peanut Butter Drizzle: Drizzling peanut butter on top amps the flavor and adds a creamy texture that you’ll want to eat by the handful.
- Alternative Toppings: Swap out Hershey kisses for mini marshmallows or candy canes for a playful shape variation.
- Dietary Adjustments: Using dairy-free chocolate chips makes these treats vegan-friendly while keeping all their charm.
How to Make Reese’s Christmas Tree Treats Recipe
Step 1: Get Your Chocolate Ready
Start by gently melting your chocolate chips in a microwave-safe bowl. I usually zap mine in 20-second bursts, stirring between each to avoid burning the chocolate. The smooth melted chocolate acts as the “glue” to hold your tree together, so keep it warm and liquid but not too hot to handle.
Step 2: Build Your Trees Layer by Layer
This is the fun part. Dab a small amount of melted chocolate on the bottom of a mini Reese’s cup, then carefully place a regular Reese’s cup upside down right on top. Add a little more melted chocolate and place another mini Reese’s cup upside down on that. Top it all off with a Hershey’s kiss, securing with melted chocolate. I recommend working on a parchment-lined tray to keep everything neat and make cleanup easier.
Step 3: Decorate Like a Pro
Now comes the festive fun—take your white and green icing and pipe little garlands around your edible trees. Sprinkle some colorful sprinkles to mimic ornaments, and stick a gold star on top by adding a dab of frosting to your Hershey’s kiss. This step always gets compliments, and I love seeing how different everyone’s decorations turn out!
Step 4: Optional Finishing Touches
If you want that extra magic of fresh snow, dust a bit of confectioners’ sugar over your trees once your frosting has set. This little touch really ups the holiday charm and gives a beautiful look that’s irresistible.
Pro Tips for Making Reese’s Christmas Tree Treats Recipe
- Smooth Melting Chocolate: Stir frequently while melting to prevent seizing and keep the chocolate glossy and spreadable.
- Work Quickly: Chocolate sets fast, so assemble each tree right after placing melted chocolate for the best adhesion.
- Use Parchment Paper: Place your assembled trees on parchment to keep them from sticking and make transferring easier.
- Cool Before Decorating: Let your trees set completely before piping icing to avoid smudging and maintain clean lines.
How to Serve Reese’s Christmas Tree Treats Recipe

Garnishes
I usually finish these treats with a sprinkle of edible glitter or tiny metallic sugar stars to add extra sparkle. A few finely crushed peppermint candies sprinkled nearby also add a beautiful pop of red and a refreshing bite alongside the rich chocolate.
Side Dishes
Serve these Reese’s Christmas Tree Treats alongside warm drinks — think hot cocoa or spiced apple cider — to keep the cozy vibes flowing. If it’s a holiday party, I nestle them on a platter with gingerbread cookies and salted caramel popcorn for an irresistible festive spread.
Creative Ways to Present
Once, I arranged these chocolate trees inside a clear glass cake dome with a dusting of fake snow beneath for a centerpiece that doubled as dessert. Wrapping them individually in colorful cellophane and tying with a festive ribbon also makes excellent party favors or stocking stuffers.
Make Ahead and Storage
Storing Leftovers
I store mine in an airtight container at room temperature — just away from heat to keep the chocolate from melting. They stay fresh and delicious for about 3-4 days, which is perfect if you make a few batches ahead for holiday gatherings.
Freezing
Freezing these treats is totally doable if you want to prepare early. I wrap each tree gently in wax paper and place them in a sealed freezer bag or container. When you’re ready to enjoy, let them thaw slowly at room temperature to prevent condensation from messing up your decorations.
Reheating
Because these are no-bake treats, reheating isn’t really necessary. However, if you want to soften the chocolate slightly before serving, try a few seconds in a low-power microwave or a warm spot in your kitchen — just watch closely so you don’t melt your carefully crafted trees!
FAQs
-
Can I use other types of candy instead of Reese’s for this Christmas Tree Treat?
Absolutely! While Reese’s bring that classic peanut butter and chocolate combo, you can experiment with other chocolates or even stack mini peanut butter cups with different chocolate candies to create your own festive tree.
-
How long do Reese’s Christmas Tree Treats last?
Stored in an airtight container at room temperature, these treats maintain their best flavor and texture for about 3 to 4 days. Keep them away from heat to avoid melting or sticky decorations.
-
Can kids help make this recipe?
Definitely! The assembly and decorating steps are so simple and fun that kids love getting involved. Just be sure to supervise when handling melted chocolate to keep things safe.
-
Can I prepare these treats in advance for a party?
Yes, this recipe is great for make-ahead dessert prep. Prepare and decorate the trees a day or two before your event, then store them properly. They’re sure to impress without last-minute stress.
Final Thoughts
This Reese’s Christmas Tree Treats Recipe has become one of my holiday go-tos because it brings so much joy with so little fuss. I remember the first time I made these with my kids, and the smiles while decorating were priceless. If you’re looking for a festive, delicious, and easy treat that everyone will remember, this is it. Give it a whirl — I promise your holiday celebrations will be sweeter and even more fun!
Print
Reese’s Christmas Tree Treats Recipe
- Prep Time: 10 mins
- Cook Time: 0 mins
- Total Time: 10 mins
- Yield: 24 trees
- Category: Dessert
- Method: No-Cook
- Cuisine: American
Description
These festive Reese’s Trees are a delightful and easy-to-make holiday treat, featuring stacked Reese’s peanut butter cups and Hershey’s kisses decorated with frosting, sprinkles, and gold stars to resemble Christmas trees. Perfect for parties or gifting.
Ingredients
Chocolate and Candy
- 1/2 cup chocolate chips, melted
- 24 mini Reese’s cups
- 12 regular Reese’s cups
- 12 Hershey kisses
Decorations
- White and green decorating icing
- Sprinkles
- Gold stars (small edible decorations)
- Confectioners’ sugar (optional, for dusting)
Instructions
- Assemble the Tree Base: Place a small amount of melted chocolate on the bottom of a mini Reese’s cup to act as adhesive. Then, arrange a regular-size Reese’s cup upside down on top of the mini cup, followed by a small drop of melted chocolate to secure it.
- Add the Tree Layers: Place another mini Reese’s cup upside down on top of the regular Reese’s cup, dabbing with melted chocolate to hold the layers together.
- Top the Tree: Dab more melted chocolate on top and secure a Hershey’s kiss as the tree topper.
- Decorate the Trees: Using the white and green decorating icing, pipe garlands around the tree stack. Sprinkle decorative sprinkles to mimic ornaments. Add a small amount of frosting to the top of the Hershey’s kiss and adhere a gold star to finish the look.
- Add Snow Effect (Optional): Lightly dust the completed trees with confectioners’ sugar to create a snow-like appearance.
Notes
- For best results, allow each layer to set slightly before adding the next to prevent slippage.
- Use a piping bag or a small plastic bag with the tip cut off for precise icing application.
- Store the finished trees in a cool place to prevent melting.
- These treats are best served within 1-2 days for freshness.
Nutrition
- Serving Size: 1 tree
- Calories: 120
- Sugar: 14g
- Sodium: 50mg
- Fat: 7g
- Saturated Fat: 4g
- Unsaturated Fat: 2g
- Trans Fat: 0g
- Carbohydrates: 15g
- Fiber: 1g
- Protein: 2g
- Cholesterol: 5mg


