
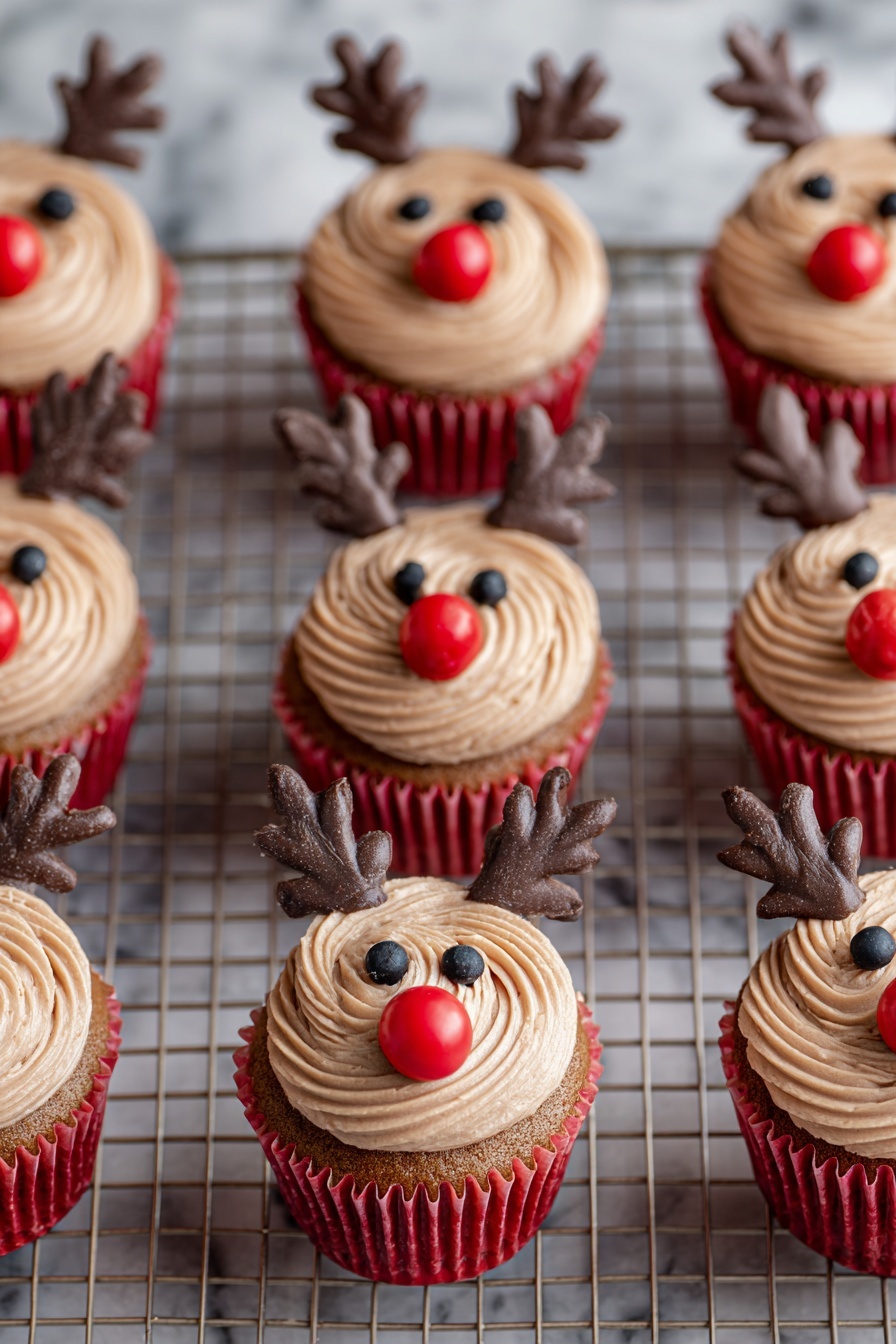
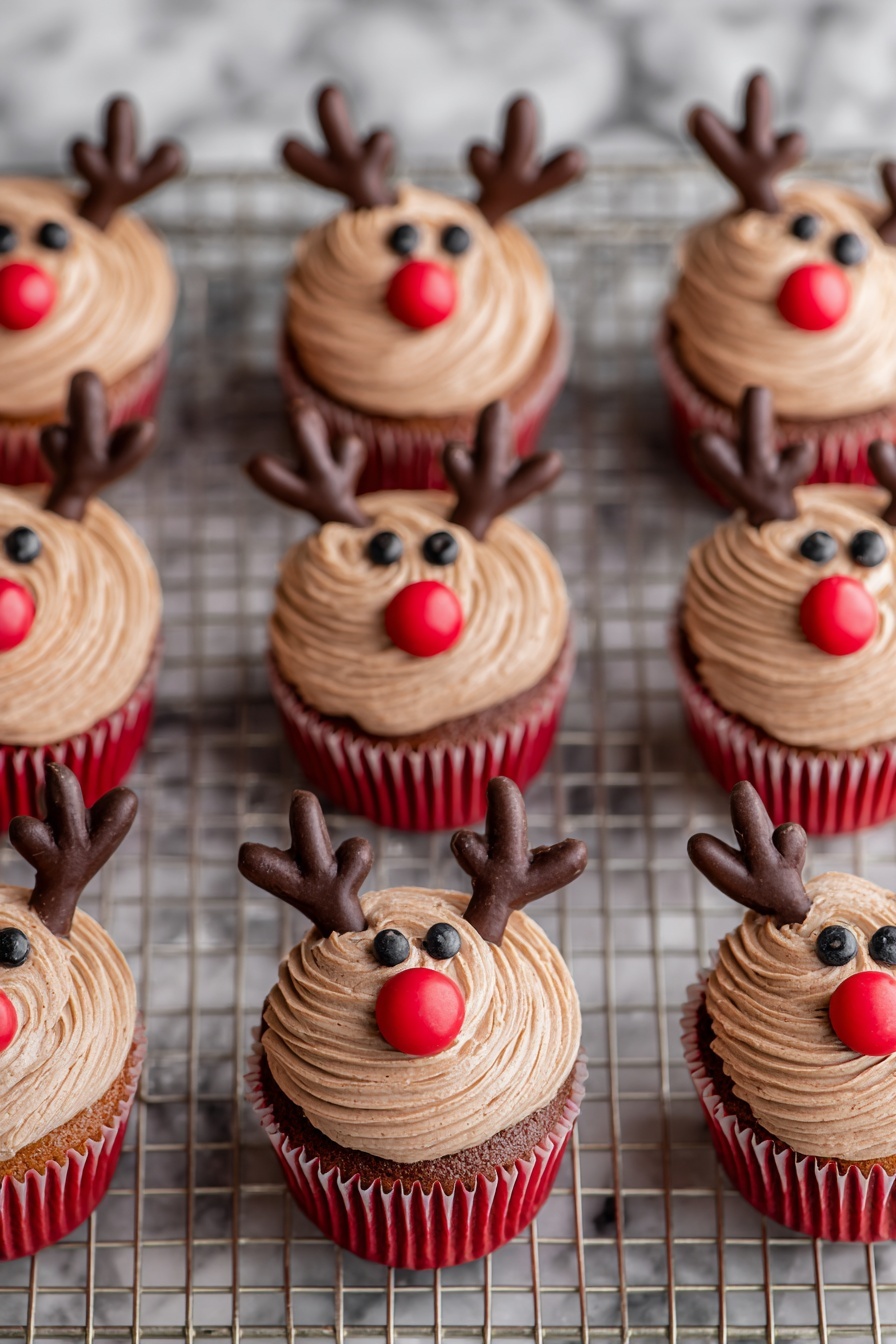
If you’re looking for a festive treat that’s both adorable and delicious, then you’re going to love this Reindeer Cupcakes with Chocolate Antlers Recipe. I absolutely love how these cupcakes add a whimsical touch to holiday parties or cozy family gatherings. Plus, they’re surprisingly easy to make, even if you’re not a seasoned baker. Stick around, and I’ll walk you through every step to get those perfect reindeer faces with chocolate antlers that everyone will go crazy for!
Why You’ll Love This Recipe
- Festive and Fun: These cupcakes instantly bring holiday cheer with their charming reindeer design.
- Simple to Make: The chocolate antler technique is straightforward yet impressive for any skill level.
- Customizable Flavors: You can use your favorite cupcake recipe as the base, so it’s perfect for your taste.
- Great for Gifting: These festive cupcakes make wonderful edible gifts that friends and family adore.

Ingredients You’ll Need
What’s great about this Reindeer Cupcakes with Chocolate Antlers Recipe is that you can personalize the cupcake flavors, but the decorating supplies are what really bring the magic. I’ve found that these ingredients work well together to bring that perfect mix of sweet, chocolatey, and colorful holiday spirit.

- Cupcake batter: Feel free to use your favorite from scratch or box mix; I prefer a classic vanilla or chocolate to keep things simple.
- Festive cupcake liners: They add that extra holiday pop and keep cupcakes neat and easy to handle.
- Candy melts chocolate: Essential for making sturdy chocolate antlers – I like Wilton brand because it melts smoothly.
- Parchment paper: Perfect for piping chocolate antlers so they peel off easily once set.
- Wilton decorating tips: Using #4 and #10 tips is key for different icing details – I learned this trick after struggling with uneven icing lines!
- Red, brown, and black icing: These bring the reindeer’s nose, face, and eyes to life—don’t skimp on quality here for vibrant color and smooth application.
- Eyeball sprinkles: Optional, but a fun detail if you want to skip piping the eyes or add a bit of whimsy.
Variations
I love how versatile this Reindeer Cupcakes with Chocolate Antlers Recipe is. You can easily switch up flavors or decorations to suit your event or dietary needs. Don’t be afraid to make it your own — that’s part of the fun!
- Flavor swaps: I’ve tried pumpkin spice cupcakes with this design during the holidays, and it’s a big hit for fall gatherings.
- Dietary adjustments: Using gluten-free or vegan cupcake mixes works beautifully and makes these treats accessible to everyone.
- Colorful noses: For a playful twist, swap red icing noses for green or gold — kids especially love this surprise!
- Antler alternatives: Instead of chocolate, you can try pretzel sticks shaped into antlers for a crunchy change.
How to Make Reindeer Cupcakes with Chocolate Antlers Recipe
Step 1: Prep Your Batter and Pan
Start by preparing your favorite cupcake batter as directed. I love using a cookie scoop here because it helps you pour even amounts into each festive liner, which means your cupcakes bake uniformly — no wonky shapes! Place liners in the cupcake tin, scoop in the batter, and pop them in the oven at 350°F (about 17 minutes is typical). Setting a timer helps avoid overbaking, which can dry out your cupcakes.
Step 2: Make the Chocolate Antlers
While your cupcakes bake, melt your candy melts slowly in the microwave. I like to do 30-second bursts at 30% power, stirring in between to keep the chocolate silky and smooth — overheating can cause it to seize, so patience pays off. Snip the tip off a disposable decorating bag fitted with a #4 tip, fill it with melted chocolate, and pipe “Y”-shaped antlers onto parchment paper. Make a few extras because a couple may break when you remove them later. Let them dry completely, ideally 15-20 minutes for best firmness.
Step 3: Cool Cupcakes and Prepare Icing
Once baked, transfer your cupcakes to a cooling rack and wait about 15-20 minutes until they’re just warm to the touch — this prevents your icing from melting as soon as you start decorating. While you wait, fit two bags with #10 decorating tips, filling one with brown icing and the other with red. Also, fit a third bag with a #4 tip for your black icing. Prepping your tools now makes decorating feel smooth and stress-free.
Step 4: Ice the Cupcakes Like a Pro
Hold the brown icing bag vertically and start swirling from the outer edge in a gentle clockwise motion toward the center to create the reindeer’s face. It doesn’t have to be perfect — I like a bit of rustic charm in the swirl. Then, carefully press two chocolate antlers into each cupcake’s top—this is where that drying time on antlers really pays off; they should slide off parchment easily and hold shape well.
Step 5: The Finishing Touches
Using the black icing, add two little dots for eyes — I sometimes use the eyeball sprinkles here if I want to speed up decorating or add cuteness. Finally, place a bright red nose right in the center with red icing. That’s it! You’ve got yourself a batch of festive, charming reindeer cupcakes that’ll steal the show at any holiday party.
Pro Tips for Making Reindeer Cupcakes with Chocolate Antlers Recipe
- Even Batter Scooping: Using a cookie scoop ensures your cupcakes bake evenly, which makes decorating way easier.
- Chocolate Melting Technique: Melting candy melts at low power in bursts keeps the chocolate shiny and smooth—avoid rushing this part!
- Antler Drying Patience: Don’t skip the drying time on antlers; they’ll break less often when fully set.
- Icing Control: Fit your decorating bags with the right tips before you start icing to keep a steady flow and avoid messy fingers.
How to Serve Reindeer Cupcakes with Chocolate Antlers Recipe
Garnishes
I stick with simple garnishes like festive sprinkles around the cupcake platter or a dusting of edible glitter on the icing for extra sparkle. Kids especially love adding candy eyes or mini chocolate chips to customize their reindeer’s expressions—it’s a fun activity and adds personality to each cupcake.
Side Dishes
I often pair these sweet treats with a cup of hot cocoa or peppermint tea for a full seasonal experience. They also go great alongside savory finger foods if you’re serving a party spread—think mini sandwiches or cheese boards to balance out the sweetness.
Creative Ways to Present
During holiday parties, I like to place each cupcake on a small decorative snowflake doily and arrange them around a centerpiece of pinecones and fairy lights. Another idea is to package a batch in a pretty box with a ribbon tied around it—makes for such a thoughtful edible gift that looks professional but is homemade.
Make Ahead and Storage
Storing Leftovers
I usually store leftover cupcakes in an airtight container at room temperature for up to two days. This keeps the cupcakes moist, and the icing stays fresh. If your kitchen is warm, popping them into the fridge can help, but bring them back to room temp before serving for best flavor.
Freezing
I freeze undecorated cupcakes wrapped tightly in plastic wrap and stored in a freezer bag. When you’re ready to enjoy, thaw them overnight in the fridge, then decorate as usual. While the antlers don’t freeze well, you can easily make fresh ones during the thaw.
Reheating
Since these are cupcakes, reheating isn’t usually necessary, but if you want to warm them slightly, pop a cupcake in the microwave for 10-15 seconds on low. Avoid overheating to keep the icing and chocolate antlers from melting or losing shape.
FAQs
-
Can I use regular chocolate instead of candy melts for antlers?
You can, but candy melts are designed to set firm and smooth at room temperature, making them ideal for shaping antlers. Regular chocolate may not set as hard or could melt more easily, leading to fragile decorations. If you do use regular chocolate, temper it properly to help it harden well.
-
How do I prevent the chocolate antlers from breaking?
Make sure to pipe the antlers on parchment paper and let them dry fully before trying to transfer. Also, piping slightly thicker antlers and making extras helps avoid disappointment when some break. Handle gently when placing on cupcakes.
-
Can I make these cupcakes ahead of time?
Yes! Bake and cool the cupcakes ahead, and keep them stored in an airtight container. It’s best to add the icing and chocolate antlers on the day you plan to serve so they look fresh and antlers stay stable.
-
What’s the best way to pipe the reindeer face icing?
Use a round decorating tip (#10) and hold the bag vertically over the cupcake’s edge. Swirl icing slowly in a clockwise motion from outside-in to get a neat and full coverage that looks like a furry face.
Final Thoughts
This Reindeer Cupcakes with Chocolate Antlers Recipe holds a special place in my holiday traditions—it’s one of the first festive treats I learned to make that wowed my family and friends. I love how it combines simple baking with a creative decorating touch that anyone can do with a bit of patience. So whether you’re baking with kids, hosting a party, or just want a seasonal delight, give this recipe a try. I’m confident you’ll end up with smiles all around and maybe even a new holiday favorite in your repertoire!
Print
Reindeer Cupcakes with Chocolate Antlers Recipe
- Prep Time: 15 minutes
- Cook Time: 17 minutes
- Total Time: 47 minutes
- Yield: 12 cupcakes
- Category: Baking
- Method: Baking
- Cuisine: American
- Diet: Vegetarian
Description
Create festive and fun Easy Reindeer Cupcakes perfect for holiday celebrations. This delightful recipe uses your favorite cupcake base with charming chocolate antler decorations and colorful icing to bring adorable reindeer faces to life. Ideal for parties and seasonal treats, these cupcakes combine classic baking techniques with creative decorating tips for a whimsical holiday dessert.
Ingredients
Cupcake Base
- Your favorite cupcake batter (quantity as per your recipe)
- Festive cupcake liners
Decorations
- Candy melts chocolate (amount needed to melt and pipe antlers, approx. 1 cup)
- Wilton red icing (enough to make red noses, about 1/2 cup)
- Wilton brown icing (enough to frost cupcakes, about 1 cup)
- Wilton black decorator icing (for eyes, about 1/4 cup)
- Eyeball sprinkles (optional, for decoration)
Tools
- Cupcake baking pan
- Cooling rack
- Cookie scoop
- 2 Wilton #4 decorating tips
- 2 Wilton #10 decorating tips
- Disposable decorating bags
- Parchment paper
Instructions
- Prep the Cupcake Batter and Oven
Prepare your favorite cupcake batter according to its recipe. Preheat your oven to 350°F (175°C), then place festive cupcake liners into the cupcake pan.
- Fill Cupcake Liners
Using a cookie scoop, evenly distribute the cupcake batter into each liner to ensure uniform cupcake sizes.
- Bake the Cupcakes
Bake the cupcakes for approximately 17 minutes at 350°F or according to your specific cupcake recipe’s instructions. Once baked, remove from the oven and set on a cooling rack to cool for 15-20 minutes.
- Prepare Candy Melts for Antlers
While cupcakes bake, melt candy melts chocolate in a microwave-safe bowl at 30% power in 30-second intervals, stirring in between, until smooth. Transfer melted chocolate into a disposable decorating bag fitted with a Wilton #4 tip.
- Create Chocolate Antlers
On a piece of parchment paper, pipe antler shapes in a “Y” design using the melted chocolate. Make extra antlers to account for any that may break. Allow the chocolate antlers to dry and harden completely.
- Prepare the Icing Bags
Fill disposable decorating bags fitted with Wilton #10 tips with red icing (for noses) and brown icing (for cupcake frosting). Also, fill another bag with black decorator icing fitted with a Wilton #4 tip for detailing the eyes.
- Frost the Cupcakes
Using the bag filled with brown icing, hold it vertically and swirl the icing in a clockwise motion starting from the outer edge to the center, covering the top of each cooled cupcake neatly.
- Decorate Reindeer Faces
Attach two chocolate antlers to each frosted cupcake. Use black icing to pipe two small dots for the eyes. Finish by piping a red icing nose at the center front of the cupcake to create the classic reindeer look.
Notes
- Use the cookie scoop for consistent cupcake sizes and even baking.
- Make several chocolate antlers to ensure you have extras in case of breakage.
- Let cupcakes cool thoroughly before decorating to prevent melting the icing and decorations.
- Adjust baking time slightly depending on your cupcake recipe and oven performance.
- Store finished cupcakes in a cool, dry place and consume within 2 days for best freshness.
Nutrition
- Serving Size: 1 cupcake
- Calories: 220
- Sugar: 20g
- Sodium: 150mg
- Fat: 10g
- Saturated Fat: 6g
- Unsaturated Fat: 3g
- Trans Fat: 0g
- Carbohydrates: 30g
- Fiber: 1g
- Protein: 2g
- Cholesterol: 25mg
