

If you’ve been on the hunt for a creamy, flavorful dip that elevates everything from sandwiches to roasted veggies, this Roasted Garlic Aioli Recipe is about to become your new best friend. I absolutely love this because it’s rich, garlicky without being overpowering, and pairs beautifully with just about any dish. Stick around—I’ll walk you through every step to guarantee your aioli turns out perfectly smooth and bursting with that caramelized garlic goodness.
Why You’ll Love This Recipe
- Deep Roasted Garlic Flavor: Roasting mellow’s the garlic’s sharpness, giving you a buttery, sweet aioli that tastes next-level.
- Simple Ingredients: You probably already have everything in your pantry – no fancy shopping trips required.
- Versatility: It’s not just a dip! Use it as a spread, sauce, or dressing to dress up your meals.
- Easy to Make Ahead: Prep it in advance and the flavors only get better as it chills.

Ingredients You’ll Need
To make your roasted garlic aioli, you want fresh, quality ingredients that blend into a creamy spread with a perfect balance of tang and savory notes. Here’s what works best in my kitchen and why each plays an important role.

- Garlic: Use a whole head for roasting—fresh and firm bulbs roast up soft, sweet, and mellow.
- Olive oil: Adds richness while keeping the aioli silky; extra virgin is great but a mild-tasting oil works well, too.
- Mayonnaise: The creamy base that holds everything together; opt for good quality or homemade if you have time.
- Lemon juice: Brightens and balances sweetness with acidity—fresh squeezed is best.
- Dijon mustard: Adds subtle depth and a hint of tang without overpowering the garlic.
- Salt and pepper: Essential to season and bring out the flavors.
- Fresh herbs (parsley or chives): Optional but they lend a pop of color and fresh flavor.
Variations
I love making this roasted garlic aioli my own depending on what I’m pairing it with or my mood that day. Feel free to tweak it—you’ll find you can easily personalize it to suit your taste buds.
- Spicy Kick: Add a pinch of cayenne or a dash of smoked paprika—I discovered this trick gives a subtle warmth that my family goes crazy for.
- Herb Explosion: Experiment with fresh basil, tarragon, or dill for a different herbaceous flair that can transform the aioli into something new each time.
- Vegan Swap: Use vegan mayo or cashew cream to keep it dairy- and egg-free without losing any creaminess.
- Sweet Twist: A drizzle of honey or maple syrup can nicely balance the roasted garlic’s savoriness for a unique layered taste.
How to Make Roasted Garlic Aioli Recipe
Step 1: Roast the Garlic to Sweet Perfection
Preheat your oven to 400°F (200°C). Peel back the tough outer layers of the garlic bulb but leave the cloves intact with their skins on. Slice the top off the bulb to expose the tops of the cloves, drizzle olive oil over them, and wrap the bulb tightly in foil. Pop it into the oven and roast for about 30-40 minutes until the cloves turn golden and feel soft when pressed. Roasting might sound intimidating, but this step is what mellows the garlic’s sharpness into creamy, buttery goodness—trust me, it’s worth the wait!
Step 2: Mash and Mix Your Aioli Base
Once the garlic is roasted and cool enough to handle, squeeze the soft cloves out of their skins into a small bowl. Mash them with a fork until they’re smooth and creamy. Next, mix in the mayonnaise, lemon juice, and Dijon mustard. Stir everything together gently, then season with salt and pepper to taste. I like to taste as I go here so I can get the balance just right. If you want a smoother texture, using a food processor or blender can make the mixture velvety—but sometimes the rustic mash is what I prefer!
Step 3: Chill and Garnish
Transfer your aioli to a serving dish or airtight container. Refrigerate for at least 30 minutes before serving—this chill time lets the flavors really marry and deepen. Lastly, sprinkle chopped parsley or chives on top for a burst of fresh color and flavor. I promise this little touch makes the presentation pop, especially when serving guests.
Pro Tips for Making Roasted Garlic Aioli Recipe
- Roastevenly: Choose garlic bulbs that are uniform in size to ensure all cloves roast at the same rate, avoiding burnt or undercooked pieces.
- Perfect Consistency: If the aioli feels too thick after chilling, add a teaspoon of water or extra lemon juice gradually to loosen it up without diluting flavor.
- Blend for Smoothness: For a restaurant-quality texture, pulse the ingredients in a food processor—you’ll get that silky smooth aioli that spreads effortlessly.
- Avoid Over-Salting: Since mayo already contains salt, season your aioli slowly and taste as you go to prevent it from becoming too salty.
How to Serve Roasted Garlic Aioli Recipe

Garnishes
I usually go with freshly chopped parsley or chives to top off the aioli when serving. It adds just the right amount of color and subtle herbal brightness that balances the richness beautifully. Sometimes, I’ll sprinkle a little smoked paprika for a smoky punch that looks stunning too!
Side Dishes
This aioli pairs perfectly with crispy roasted potatoes, grilled veggies, or even as a dip for your favorite crusty bread. When I’m feeling indulgent, I’ll slather it on burgers or serve it alongside fried calamari—it never disappoints and always gets raves.
Creative Ways to Present
For special occasions or when I want to impress guests, I serve this aioli in mini ramekins garnished with edible flowers or microgreens. I’ve also swirled it atop grilled seafood platters or drizzled it artistically over roasted vegetable boards for a polished, gourmet look. A little presentation effort goes a long way!
Make Ahead and Storage
Storing Leftovers
I always keep my leftover roasted garlic aioli in an airtight container in the fridge. It stays fresh and flavorful for up to a week, which is perfect for quick snacks or boosting weekday meals. Just give it a good stir before using to bring back that creamy texture.
Freezing
While you can freeze roasted garlic aioli, I generally avoid it because the texture can separate a bit after thawing. If you do freeze it, use a freezer-safe container and thaw slowly in the fridge, then whisk it thoroughly before serving.
Reheating
Since aioli is best served cold or at room temperature, I don’t recommend reheating. If it feels too thick after chilling, simply let it sit out for 15 minutes and stir well, or add a splash of water or lemon juice to loosen it up.
FAQs
-
Can I use store-bought roasted garlic instead of roasting my own?
Absolutely! While roasting fresh garlic gives the freshest and most aromatic flavor, jarred roasted garlic can work in a pinch. Just be mindful of the texture and any added preservatives that might affect taste.
-
How long does roasted garlic aioli last in the fridge?
Stored properly in an airtight container, it will stay fresh for up to one week. Always give it a quick sniff and taste before using to ensure it hasn’t spoiled.
-
Can I make this recipe vegan or dairy-free?
Yes! Swap regular mayonnaise for a vegan or dairy-free version to keep the creamy texture without animal products. The roasted garlic flavor remains wonderfully intact.
-
What’s the best way to get smooth roasted garlic aioli?
Using a food processor or blender helps create an ultra-smooth texture. If you prefer a bit of rustic charm, mashing by hand works too, but blending guarantees silky perfection.
Final Thoughts
This roasted garlic aioli recipe is truly one of those kitchen gems that once you make it, you’ll wonder how you ever lived without it. It’s easy to throw together, uses simple ingredients, and instantly turns everyday meals into something special. I hope you enjoy making and sharing it as much as I do—it’s perfect for impressing guests or just treating yourself to something delicious at home. Give it a try and let me know how it elevates your dishes!
Print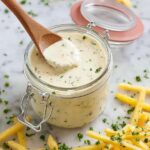
Roasted Garlic Aioli Recipe
- Prep Time: 5 minutes
- Cook Time: 40 minutes
- Total Time: 45 minutes
- Yield: 8 servings
- Category: Sauce / Condiment
- Method: Baking
- Cuisine: French
Description
This Roasted Garlic Aioli is a creamy, flavorful sauce made by roasting garlic to bring out its natural sweetness and blending it with mayonnaise, lemon juice, and Dijon mustard. Perfect as a dip, spread, or condiment, this easy-to-make aioli adds a rich, garlicky punch to sandwiches, seafood, vegetables, and more.
Ingredients
Roasted Garlic
- 1 head garlic
- 1 tablespoon olive oil
Aioli Sauce
- ½ cup mayonnaise
- 1 tablespoon lemon juice
- ½ teaspoon Dijon mustard
- Salt and pepper, to taste
- Parsley or chives, chopped, for garnish
Instructions
- Preheat the Oven: Preheat your oven to 400°F (200°C) to prepare for roasting the garlic.
- Prepare the Garlic Bulb: Peel away the outer layers of the garlic bulb without separating the cloves. Slice off the top of the bulb with a sharp knife to expose the garlic cloves inside.
- Wrap Garlic for Roasting: Place the prepared garlic bulb on a piece of aluminum foil. Drizzle the exposed cloves with olive oil, then wrap the bulb tightly in the foil to keep moisture in during roasting.
- Roast Garlic: Place the wrapped garlic bulb in the oven and roast for 30-40 minutes until the cloves are soft and golden brown.
- Cool and Mash Garlic: Remove the garlic from the oven and let it cool slightly. Squeeze the roasted cloves out of their skins into a small bowl and mash them with a fork until smooth and creamy.
- Make the Aioli: In a separate bowl, combine the mashed roasted garlic, mayonnaise, lemon juice, and Dijon mustard. Stir well until all ingredients are blended smoothly.
- Season and Garnish: Season the aioli with salt and pepper to taste. Optionally, add chopped fresh parsley or chives for extra flavor and color.
- Chill the Aioli: Transfer the aioli to a serving dish or airtight container and refrigerate for at least 30 minutes to allow the flavors to meld before serving.
Notes
- Roast extra garlic cloves along with the ones needed for the aioli; they make a delicious spread or addition to other dishes.
- For a smoother texture, blend the aioli ingredients in a food processor or blender.
- If the aioli is too thick, thin it with a bit of water or extra lemon juice.
- The aioli thickens after chilling, so adjust consistency accordingly before refrigerating.
- Customize the flavor by adding smoked paprika, honey, or other seasonings to create your unique twist.
Nutrition
- Serving Size: 2 tablespoons
- Calories: 110
- Sugar: 0.3g
- Sodium: 120mg
- Fat: 11g
- Saturated Fat: 1.7g
- Unsaturated Fat: 9g
- Trans Fat: 0g
- Carbohydrates: 1g
- Fiber: 0.1g
- Protein: 0.3g
- Cholesterol: 5mg

