
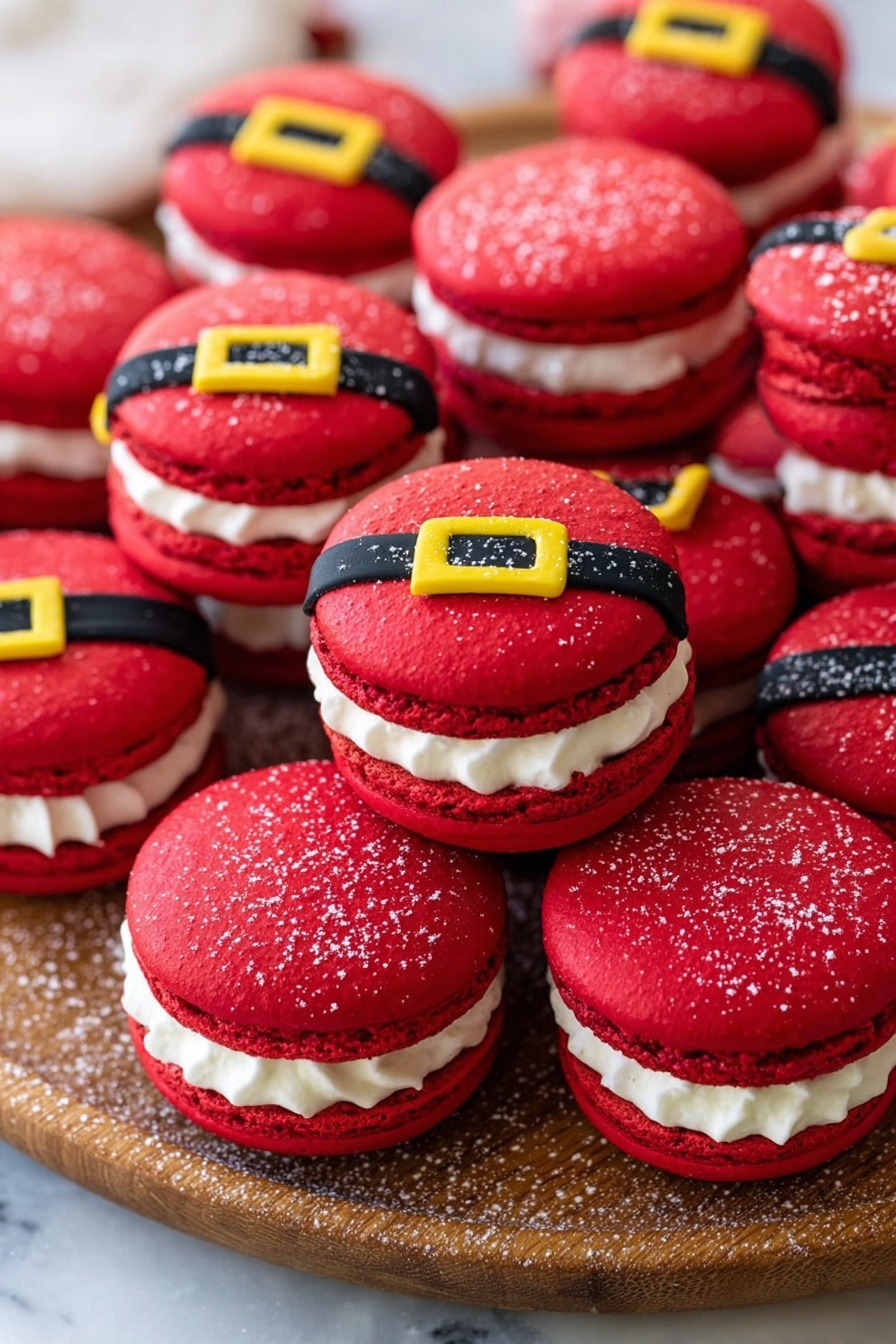
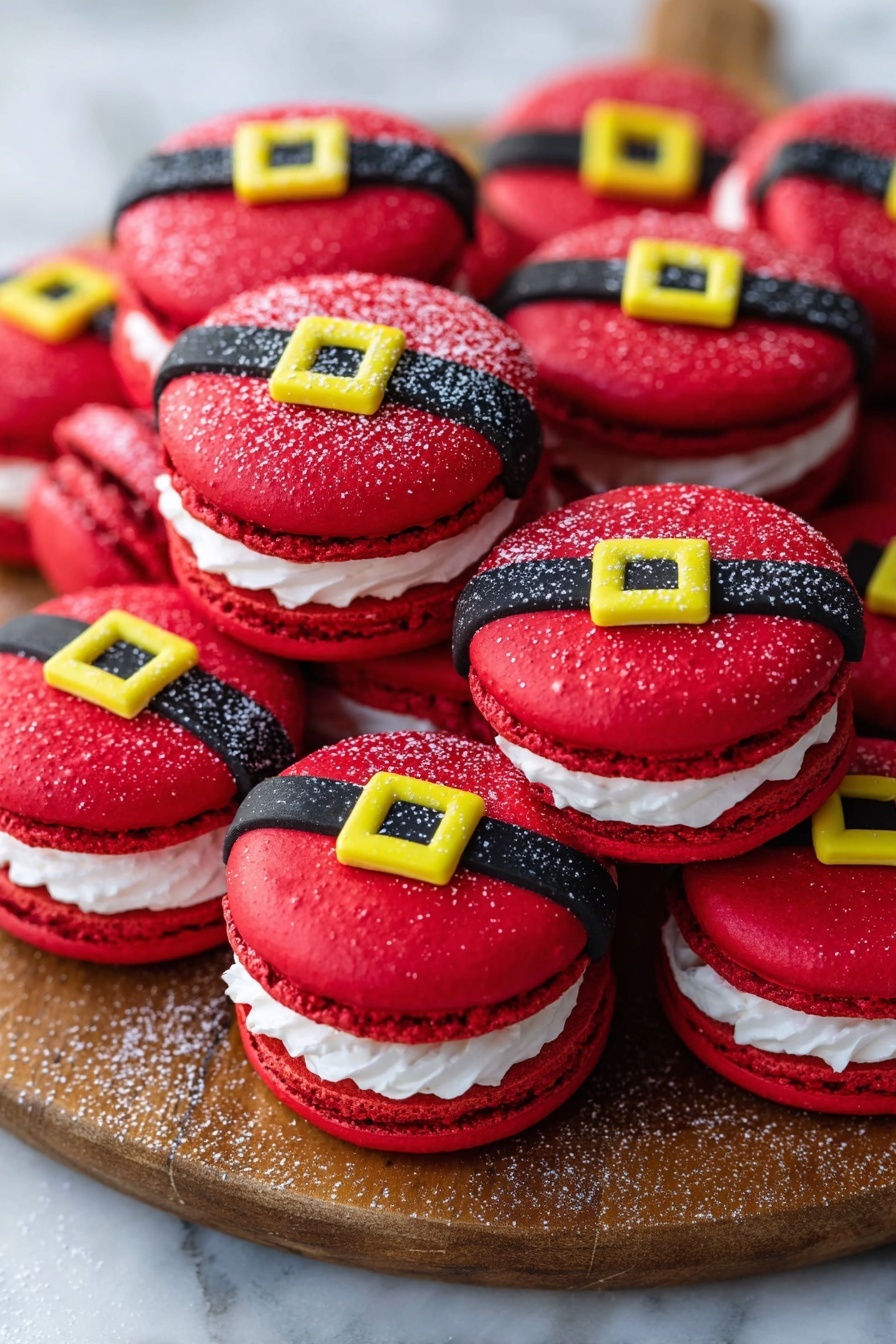
If you’re looking for a festive treat that’s both charming and delicious, you’re in the right place! I’m sharing my go-to Santa Claus Macarons Recipe, and let me tell you, these little beauties never fail to impress. With their vibrant red shells, sweet buttercream filling, and cute Santa belt details, these macarons are perfect for the holidays or any time you want to spread some joy. Stick around, because I promise this recipe is fan-freaking-tastic and easier than it looks once you’ve got a few tricks under your belt.
Why You’ll Love This Recipe
- Festive Fun: Decorating these macarons with Santa’s belt is the cutest holiday touch that everyone notices.
- Perfect Texture: The shells come out with that ideal crisp exterior and chewy center every time.
- Flavor Layering: The homemade sugar cookie buttercream with shredded coconut adds a wonderful twist to traditional macarons.
- Make Ahead Friendly: These macarons freeze amazingly well, so you can prep in advance for holiday parties.

Ingredients You’ll Need
The magic of this Santa Claus Macarons Recipe starts with quality ingredients that complement each other beautifully. From the almond flour for delicate shells to the golden sugar that adds warmth to the buttercream, each ingredient plays a role. Take your time picking out fresh eggs and sift your dry ingredients carefully to get that smooth texture we all crave.
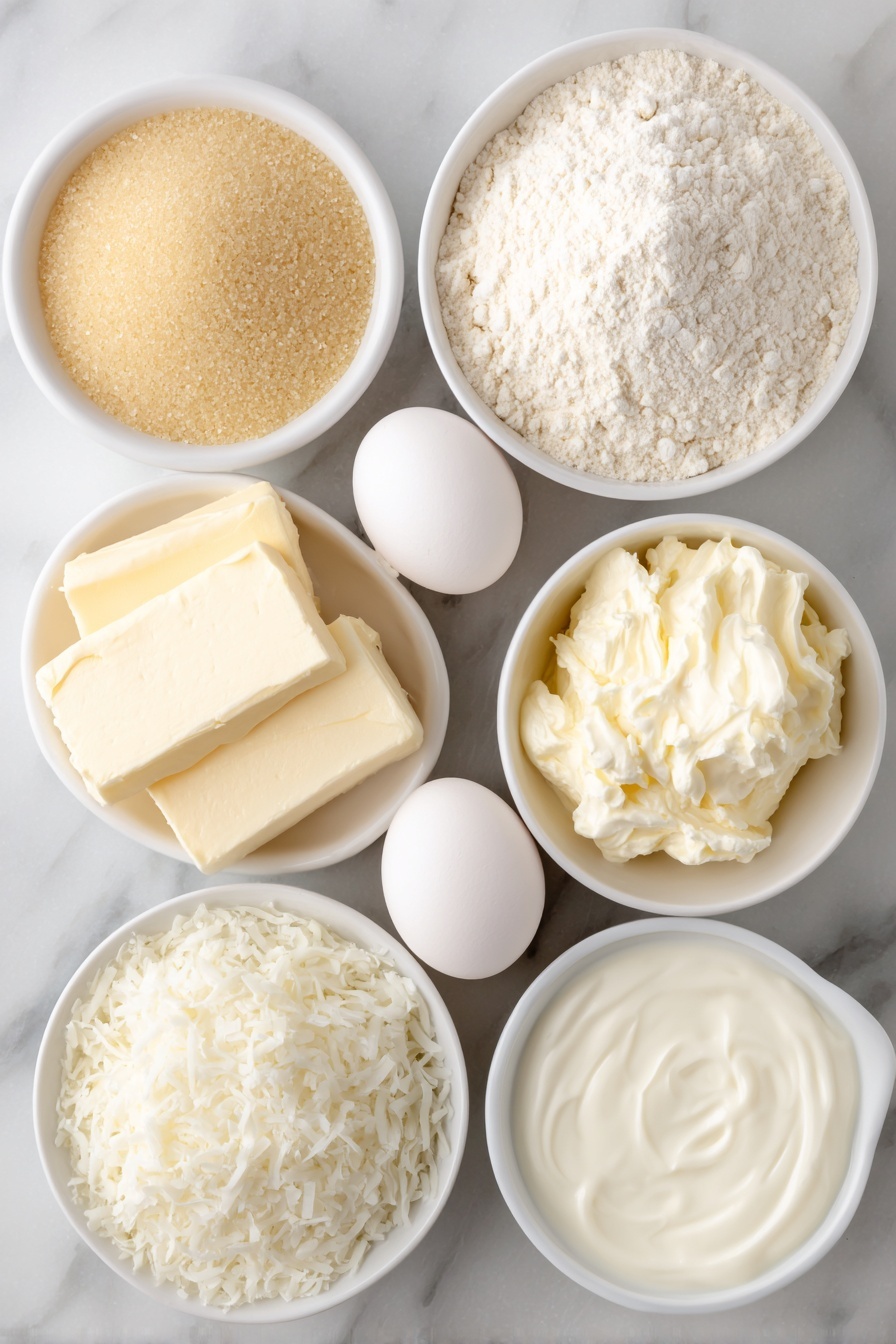
- Domino® Golden Sugar: It gives a subtle caramel flavor that makes the buttercream special.
- Egg white powder (optional): Handy if you live in a humid climate; it helps stabilize the meringue.
- Egg whites: Make sure they’re at room temperature for better whipping results.
- Almond flour: Choose a finely ground, blanched almond flour for smooth shells.
- Domino® Powdered Sugar: Provides the sweetness and smooth texture in the macaron batter and icing.
- Meringue powder: Key to making a smooth, stable royal icing.
- Gel food coloring (black, yellow, red): Use gel for vivid colors without altering the batter’s consistency.
- All-purpose flour: For the buttercream, baked to make it safe and to add subtle flavor.
- Unsalted butter: Softened, it makes the buttercream luxuriously creamy.
- Vanilla and almond extracts: A duo for that classic cookie flavor.
- Milk or heavy cream: Adjusts buttercream texture to your liking.
- Desiccated coconut: Adds a lovely texture and snow-like effect when rolling the filled macarons.
Variations
One of the best things about this Santa Claus Macarons Recipe is how easy it is to tailor it to your preferences or dietary needs. I’ve played with different fillings and even switched up the decorations to fit other occasions, so don’t hesitate to get creative!
- Nut-Free Variation: Swap almond flour for a nut-free baking blend – just be prepared for a slightly different texture.
- Flavor Swap: I once replaced the sugar cookie buttercream with peppermint buttercream for a refreshing holiday twist that my family adored.
- Color Play: Instead of classic red, try green or gold shells for an elegant look; just adjust your food coloring accordingly.
- Vegan Version: Use aquafaba in place of egg whites and a vegan butter substitute in the filling for a plant-based treat.
How to Make Santa Claus Macarons Recipe
Step 1: Prep Your Workspace and Ingredients
Begin by laying out all your ingredients and tools. I like to prep the piping bags and line my baking sheets with parchment paper or a silicone mat with a macaron template. This little step saves so much hassle later! Also, preheat your oven to 300ºF well in advance — I’ll tell you why later. Sifting your powdered sugar with almond flour ensures a smooth batter with no lumps, which is key for those pretty shells.
Step 2: Make the Meringue with Care
This part almost feels like a little science experiment — you’re melting sugar the gentle way over simmering water and whipping until stiff peaks form. I learned that touching the mixture to check for sugar granules is a game changer — keep whisking over the bain-marie until it’s silky smooth. Then, whip that meringue patiently! Don’t rush it; it can take up to 15 minutes, but watching for those glossy, stiff peaks is the golden ticket. Overwhipping or underwhipping can lead to cracked shells or nasty hollow macarons.
Step 3: Fold in Dry Ingredients and Color
Once your meringue is ready, carefully fold in the sifted almond flour and powdered sugar. This step requires some muscle and finesse — fold gently, forming a letter ‘J’ with your spatula. You want to release air slowly without deflating the meringue. The batter should end up shiny and flow off the spatula in thick, smooth ribbons. Add your red gel food coloring now — I usually use about one tablespoon for that vibrant Santa red, but feel free to add more or less depending on your shade preference.
Step 4: Pipe, Rest, and Bake the Macaron Shells
Fill your piping bag and pipe onto your prepared sheets, using the template circles as a guide. I like to hold the bag straight up for even circles and pull up quickly to get smooth edges. Don’t forget to bang the trays on your counter to pop any air bubbles — those are not your friends! This recipe has a twist: because of the red coloring, you must rest the shells until they dry and form a skin. I usually wait 30-60 minutes, but this depends on your environment. When you can gently touch the shells without batter sticking, it’s time to bake. Bake at 300ºF for about 15-20 minutes — ovens vary, so check for firm tops and that signature macaron “feet.” I bake one tray at a time for best results.
Step 5: Prepare the Royal Icing Decorations
While the shells cool, whip up your royal icing — it’s fun and simple! The key here is to get the right consistency: glossy and thick, like sweetened condensed milk. Divide it and tint half black (Santa’s belt) and a bit less to yellow (belt buckle). Pipe the black line across the middle of half the shells, then add the yellow buckle once the black icing has dried a bit. I pop mine in the fridge for a few minutes to speed this up.
Step 6: Make the Sugar Cookie Buttercream
Here’s a trick I discovered to keep you safe and happy eating this buttercream: heat-treat the flour by baking it briefly. It takes away any raw flour taste and ensures safety. Beat together butter and sugars until creamy, then add cooled flour, extracts, and a splash of milk or cream for the perfect texture. This frosting is dreamy — sweet, buttery, and that faint coconut crunch from the shredded coconut really elevates the flavor.
Step 7: Assemble Your Santa Claus Macarons
Fill a piping bag with your buttercream and pipe a generous dollop onto one shell, then sandwich with a decorated one. Before serving, gently roll the edges of the macaron in shredded coconut — it’s like Santa’s snow, and tastes amazing! This final step always gets compliments when I make these for friends.
Pro Tips for Making Santa Claus Macarons Recipe
- Resting Time Matters: Don’t rush the resting process — letting that skin form on the shell prevents cracking in the oven.
- Use Gel Food Coloring: It’s vibrant and won’t mess with your batter consistency like liquid colorings might.
- Temperature Awareness: Preheating your oven a good hour beforehand stabilizes the temperature and results in even baking.
- Don’t Skip Popping Air Bubbles: Use a toothpick immediately after piping to pop any bubbles to get smooth macaron tops.
How to Serve Santa Claus Macarons Recipe
Garnishes
I love rolling the filled macarons in desiccated coconut – it adds a snowy, festive touch and a subtle texture that pairs beautifully with the smooth buttercream. Sometimes I sprinkle edible glitter on top for a bit of sparkle when serving during holiday gatherings.
Side Dishes
Pair these with a warm cup of spiced hot cocoa or a lightly brewed green tea to balance the sweetness. They’re also delightful alongside simple sugar cookies or a fruit platter to create a festive dessert spread.
Creative Ways to Present
For a holiday party, I’ve arranged these macarons in a circular pattern around a small bowl of chocolate ganache for dipping — guests love the interactive element! You can also gift them in clear boxes tied with red and green ribbons for a beautiful edible present your friends and family will adore.
Make Ahead and Storage
Storing Leftovers
These macarons keep wonderfully in an airtight container in the fridge for up to five days. I usually keep them on a small plate covered with a cake dome or tightly wrapped in plastic wrap to preserve freshness — they taste fresher that way than stored in plastic containers alone.
Freezing
If you want to make these ahead for the holidays, they freeze beautifully. I freeze the assembled macarons in single layers on a baking sheet, then transfer them to freezer-safe bags or containers. They keep for 1-2 months with no significant loss in texture or flavor. Just thaw slowly in the fridge before serving.
Reheating
Macarons don’t need reheating, but if you prefer them slightly less chilled, let them sit at room temperature for 15-20 minutes before enjoying. This brings out the flavors and softens the buttercream just right.
FAQs
-
Can I make the macaron shells without egg white powder?
Absolutely! Egg white powder is optional and mainly helpful if you live in a humid environment. If you don’t have it, just use fresh egg whites and follow the rest of the recipe as is.
-
Why do I need to let the shells rest before baking?
Resting allows the macaron shells to form a skin that prevents cracking in the oven and helps develop their characteristic feet. For this recipe, resting is especially important because of the red food coloring used.
-
How do I know when the meringue is whipped enough?
You want the meringue to be glossy and hold stiff peaks. When you lift your whisk, the peaks should stand up firmly with a slight curl at the tip but not flop over. This usually takes 13-15 minutes but focus on the texture, not the clock.
-
Can I make the buttercream ahead of time?
Yes! You can prepare the buttercream in advance and store it in an airtight container in the fridge for up to 3 days. Bring to room temperature and re-whip before piping to restore its creamy texture.
-
What if my macarons are hollow inside?
Hollow macarons usually happen from overwhipping the meringue or overmixing the batter. Be gentle when folding and stop whipping the meringue once stiff peaks form—not beyond. Also, avoid overly thin or overly thick batter consistency.
Final Thoughts
I absolutely love how this Santa Claus Macarons Recipe brings together festive flair and classic macaron charm. When I first tried making these, I struggled with the color and cracking shells, but once I nailed the resting and whipping techniques, they became a holiday staple in my kitchen. My family goes crazy for them—they’re as delightful to eat as they are to look at. Trust me, once you try this recipe, you’ll want to make it every season. So grab your piping bag, dust your countertop with almond flour, and get ready to bake some Christmas magic!
Print
Santa Claus Macarons Recipe
- Prep Time: 2 hours
- Cook Time: 40 minutes
- Total Time: 2 hours 40 minutes
- Yield: 22 macarons
- Category: Dessert
- Method: Baking
- Cuisine: French
Description
Santa Claus Macarons are festive, delicate French cookies with bright red shells filled with a sugar cookie buttercream and decorated with royal icing to resemble Santa’s belt and buckle. These macarons feature a crisp exterior, chewy interior, and a deliciously creamy coconut buttercream, making them perfect holiday treats that combine classic macaron technique with fun seasonal decoration.
Ingredients
Macaron Shells
- 100 grams Domino® Golden Sugar
- 4 grams egg white powder (optional)
- 100 grams egg whites
- 105 grams almond flour
- 105 grams Domino® Powdered Sugar
- Red gel food coloring, about 1 tbsp
Royal Icing
- 1 1/2 cups (187 grams) Domino® Powdered Sugar
- 1 tbsp meringue powder
- 4 tbsp water
- 2 drops black gel food coloring
- 1 drop yellow gel food coloring
Sugar Cookie Buttercream
- 1/2 cup (63 grams) all-purpose flour
- 1/2 cup (113 grams) unsalted butter
- 1/4 cup (50 grams) Domino® Golden Sugar
- 1 1/4 cup (156 grams) Domino® Powdered Sugar
- 1 tsp vanilla extract
- 1/8 tsp almond extract
- 1/2 tbsp milk or heavy cream
- 1/4 cup (50 grams) desiccated coconut (shredded)
Instructions
- Prepare Macaron Ingredients and Workspace: Gather all ingredients and equipment. Fit a large piping bag with a 1/4” round tip. Line two baking sheets with parchment or silicone mats, ideally with a macaron template.
- Sift Dry Ingredients: Sift together the powdered sugar and almond flour. Set aside.
- Preheat Oven: Preheat your oven to 300ºF for about 60 to 90 minutes to stabilize temperature. For convection ovens, use 270ºF. Experiment for best results.
- Melt Sugar with Egg Whites: Place a bowl over a pan with barely simmering water. Add granulated sugar and optional egg white powder, whisking to prevent clumping. Add egg whites and whisk until sugar is fully dissolved, over the warm bath but without touching the water, then remove.
- Whip Meringue: Transfer mixture to a stand mixer bowl. Start whipping on low for 30 seconds, then medium low for 2 minutes, then medium-high until stiff, glossy peaks form, about 13-15 minutes. Avoid over-whipping to prevent hollow macarons.
- Mix Dry Ingredients into Meringue: Pour sifted powdered sugar and almond flour into the meringue. Add about 1 tbsp red gel food coloring if desired. Fold gently using a spatula in letter J motions until batter becomes glossy with thick, flowing consistency that forms figure eights when dripped off spatula, taking 10-15 seconds to incorporate back.
- Pipe Macarons: Transfer batter to piping bag and seal top. Pipe round circles onto lined trays over template, applying firm but gentle pressure for 3-5 seconds, then lift and twist to finish. Tap trays on counter to release air bubbles and pop any surface bubbles with toothpick.
- Rest Macaron Shells: Let piped shells rest at room temperature until a firm skin forms on top, dry to touch and not soft. This is crucial due to large food coloring addition; resting prevents cracking during baking.
- Bake Macarons: Bake one tray at a time for 15-20 minutes. Baking times may vary (13-30 minutes) depending on oven and temperature. Fully baked macarons will have formed feet, deeper color, and top will not feel soft or jiggly. Let cool before decorating.
- Make Royal Icing: Place powdered sugar and meringue powder in mixer bowl. Gradually add water while mixing on low, then raise speed to medium-high and whip till glossy and fluffy with thick, flowy consistency. Adjust thickness by adding water or powdered sugar.
- Color Royal Icing and Prepare Piping Bags: Divide icing into two bowls; tint one black using 2 drops black gel color and the other yellow using 1 drop yellow gel color. Transfer black icing to piping bag fitted with size 3 tip, and yellow icing to size 2 tip. Keep covered to prevent drying.
- Decorate Shells: Pipe a black line across center of half the shells to form Santa’s belt. Allow to dry a few minutes (refrigerate to expedite). Then pipe a yellow square buckle over the black belt line.
- Prepare Sugar Cookie Buttercream: Heat treat flour by baking on parchment-lined tray at 350ºF for 5 minutes, stirring halfway, then cool. Cream butter and sugars for 4-5 minutes until smooth. Add heat-treated flour, vanilla, almond extracts and mix on low to combine. Add milk or cream if needed for consistency. Adjust sweetness by adding more powdered sugar if frosting is too runny.
- Fill Macarons and Assemble: Fill piping bag with buttercream and pipe onto undecorated bottom shells. Sandwich with decorated top shells. Roll sides of assembled macarons in shredded coconut for a festive finish.
- Storage: Freeze macarons up to 1-2 months for best freshness, or refrigerate up to 5 days.
Notes
- Egg white powder is optional and recommended only in humid climates above 30% humidity to improve meringue stability.
- Resting the piped shells before baking is critical to prevent cracking due to high food coloring content.
- Oven temperatures and baking times vary widely; experiment to find optimal settings for your oven.
- Heat treating flour in the buttercream ensures it is safe to eat raw.
- Keep royal icing covered while working to prevent crust formation.
- Use parchment or silicone mats with macaron templates for uniform size and shape.
Nutrition
- Serving Size: 1 macaron
- Calories: 110
- Sugar: 12g
- Sodium: 20mg
- Fat: 5g
- Saturated Fat: 3g
- Unsaturated Fat: 1.5g
- Trans Fat: 0g
- Carbohydrates: 15g
- Fiber: 0.5g
- Protein: 2g
- Cholesterol: 20mg
