
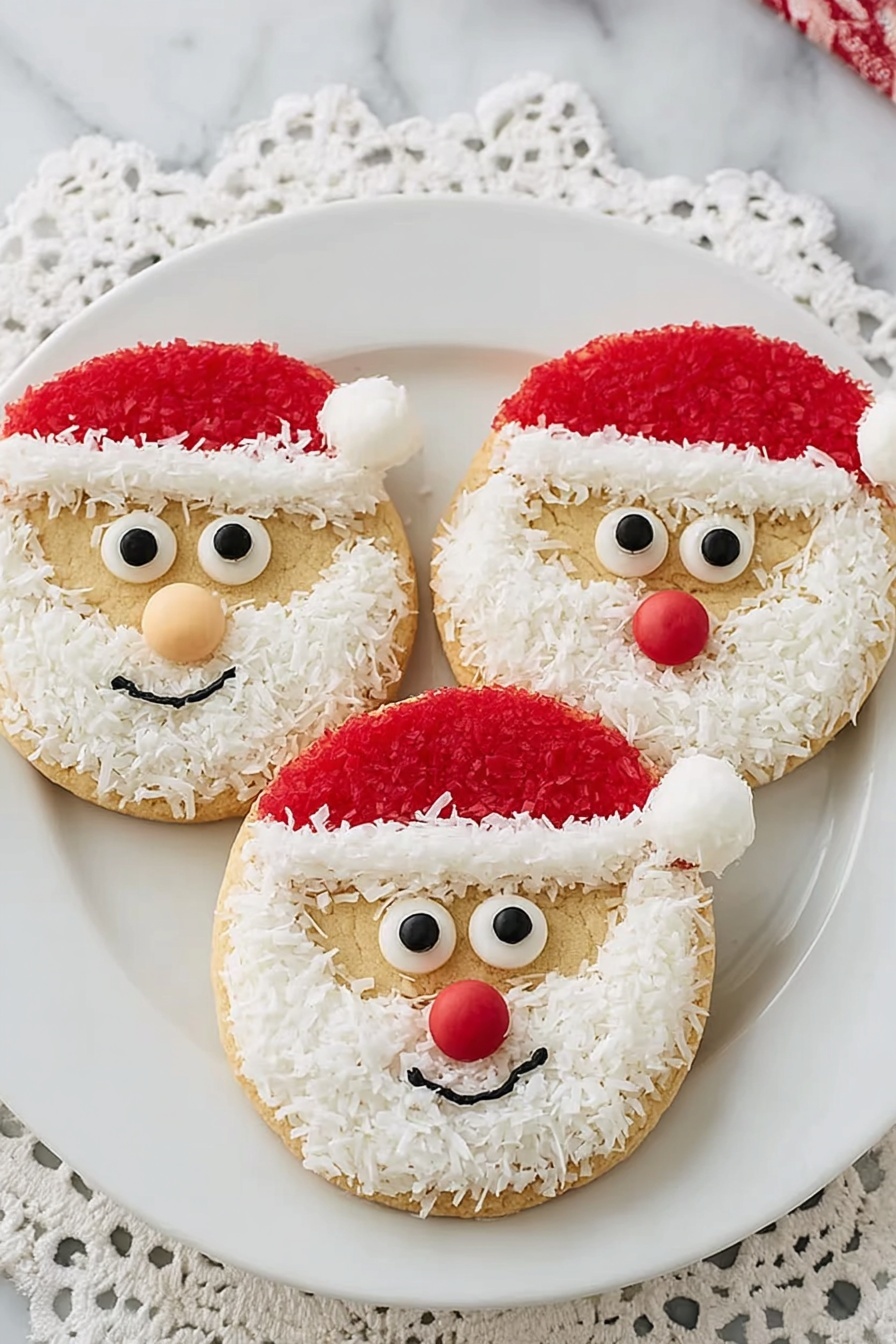
If you’re anything like me, holiday baking is not just about the treats—it’s about making memories. This Santa Sugar Cookies Recipe is one of my absolute favorites because it’s fun, festive, and the perfect way to get everyone in the kitchen together. I love how these cookies come alive with just a few simple decorations, turning a classic sugar cookie into an adorable Santa ready for the holidays. Trust me, you’ll want to keep these around after your first batch!
Why You’ll Love This Recipe
- Super Quick and Easy: You can whip these up in just 15 minutes, making them a lifesaver during busy holiday seasons.
- Kid-Friendly Fun: Decorating with candy eyes and sprinkles turns baking into a joyful, creative activity for kids and adults alike.
- No Baking Required: Using store-bought sugar cookies means less mess and less fuss, so you can focus on the fun part—decorating!
- Festive Presentation: These look picture-perfect on any holiday cookie platter or as a sweet gift from your kitchen.

Ingredients You’ll Need
This Santa Sugar Cookies Recipe works wonders with simple, easy-to-find ingredients that come together for a very festive look and taste. I usually keep these ingredients handy during the holidays for last-minute cookie decorating sessions.
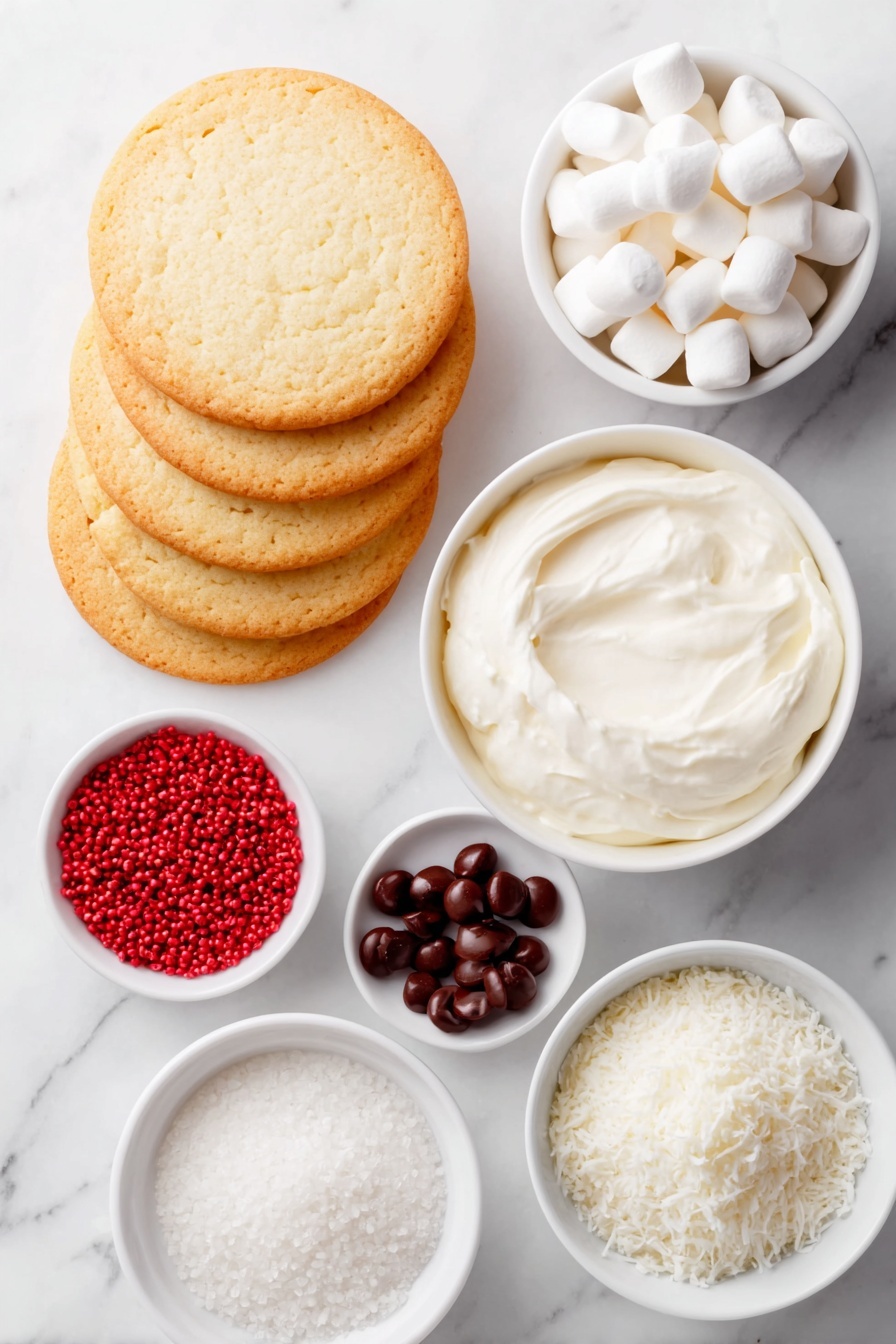
- Store-bought sugar cookies: I prefer bigger, round cookies—they make the perfect canvas for Santa’s face.
- Vanilla frosting: Betty Crocker™ Rich & Creamy Frosting Vanilla adds the right sweetness and creaminess to hold decorations in place.
- Candy eyes: Cute and essential! They add just the right pop of whimsy to your Santa faces.
- Cinnamon imperial candies: Use these for Santa’s nose—plus a little spicy twist that’s subtle but delightful.
- Red sugar sprinkles: They create a festive, sparkly effect that looks like Santa’s hat.
- Sweetened shredded coconut: This mimics the fluffy white beard perfectly, and I love how it adds texture.
- Miniature marshmallows: Placing one on top finishes off Santa’s hat with a soft “pom-pom.”
- Black edible marker: Perfect for drawing Santa’s smile—you’ll want one on hand for those finishing touches!
Variations
I love how flexible this Santa Sugar Cookies Recipe is! Over the years, I’ve mixed things up to suit different tastes and occasions—so don’t be afraid to make it your own.
- Use different frosting flavors: For a fun twist, I sometimes swap vanilla for cream cheese frosting—adds a subtle tang that pairs beautifully with the sweetness of the cookie.
- Gluten-free cookies: I’ve used gluten-free sugar cookies to accommodate friends and family, and they hold up well with the toppings too.
- Natural decorations: Try swapping candy eyes for small chocolate chips or raisins if you want to keep things a bit healthier.
- Holiday color themes: You can switch up the red sugar sprinkles for green or gold during other holidays—such a festive and easy update!
How to Make Santa Sugar Cookies Recipe
Step 1: Create Santa’s Face with Candy Eyes and Nose
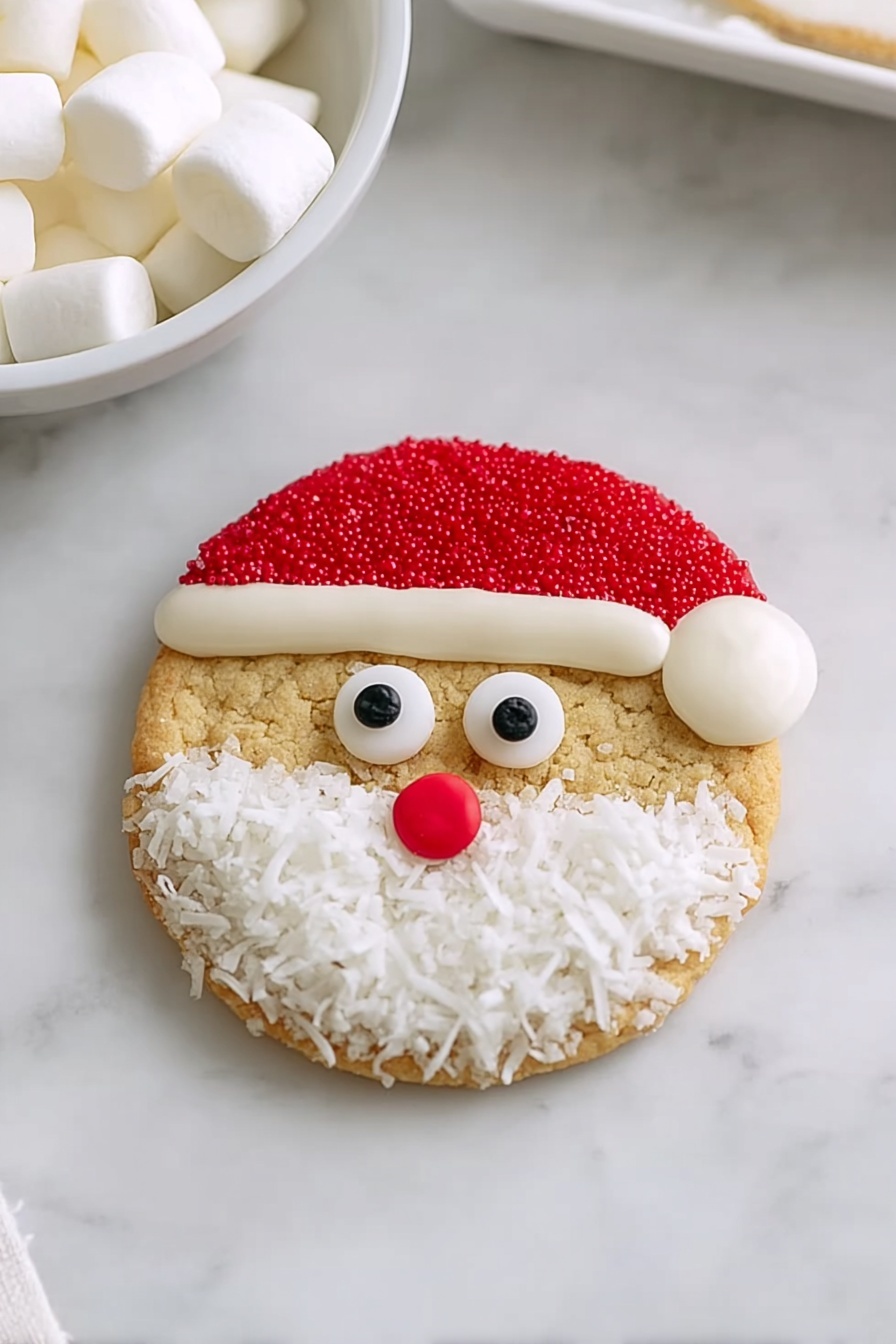
The first step is super fun and sets the tone for the entire cookie. I use a small knife or a toothpick dipped in frosting to dab a bit of frosting behind the two candy eyes and place them near the top of the cookie. Then, right between and just below the eyes, I stick on the cinnamon imperial candy to serve as Santa’s nose. This little detail adds both charm and a hint of spice. Just make sure you don’t add too much frosting or the candies might slide off later.
Step 2: Spread Red “Hat” Frosting and Sprinkles
Next, I spread vanilla frosting over the top one-third of the cookie, right above the eyes and nose. Take your time here—it doesn’t have to be perfect, but a smooth layer makes the next part easier. Then, I carefully shake red sugar sprinkles over the frosting, leaving a little line of white frosting visible at the bottom to mimic the fluffy trim of Santa’s hat. It really makes the cookie pop!
Step 3: Add Frosting and Coconut Beard
For Santa’s beard, I spread frosting over the bottom one-third of the cookie (below the nose). Immediately after, I press the sweetened shredded coconut onto the frosting to create that fluffy, wintry beard. I discovered this trick when I wanted a simple yet classic look that’s also textured—plus, the coconut gives the cookies a fresh taste. Be generous here if you want a full, bushy beard effect!
Step 4: Attach the Marshmallow Pom-Pom
Placing a miniature marshmallow at the very top of each cookie completes Santa’s hat. I use a dab of frosting under the marshmallow like glue to keep it in place. When I first tried this, I was worried the marshmallow might fall off, but frosting holds it surprisingly well. If you’re prepping these for a party, attach marshmallows just before serving for the freshest look.
Step 5: Draw a Happy Smile
Finally, I bring the cookies to life by drawing a smile under Santa’s nose using a black edible marker. It’s a simple step, but I swear it makes all the difference. I learned to go for a light hand first—you can always darken the line if you want it bolder. This step is where your Santa really gets a personality!
Pro Tips for Making Santa Sugar Cookies Recipe
- Chill Cookies Before Decorating: To prevent your frosting from melting or sliding, pop your sugar cookies in the fridge for 10 minutes before decorating—it really helps things set beautifully.
- Use a Toothpick for Precision: I love using a toothpick dipped in frosting to place candy eyes and the nose perfectly—great for avoiding sticky fingers!
- Work Quickly With Sprinkles: After spreading the frosting on the hat area, add your red sprinkles immediately for better sticking and coverage.
- Store in Airtight Containers: To keep your Santa Sugar Cookies fresh and soft, store them in airtight containers between layers with parchment paper preventing the decorations from smudging.
How to Serve Santa Sugar Cookies Recipe
Garnishes
When I serve these cookies, I like to add a little extra sparkle by dusting some extra red sugar sprinkles or a light dusting of powdered sugar to create a snowy effect. It gives the platter that extra holiday magic. Sometimes, I nestle a few pine needles or holly sprigs around the plate for that warm seasonal vibe.
Side Dishes
These Santa Sugar Cookies are perfect alongside a mug of hot cocoa or your favorite spiced holiday latte. I often serve them with a cheeseboard to mix sweet and savory or with festive fruit punches at holiday gatherings—everyone always goes crazy for that combo!
Creative Ways to Present
For special occasions, I arrange these cookies on a tiered stand decorated with mini ornaments and twinkle lights. Another fun idea I’ve tried is packaging individual cookies in clear bags tied with festive ribbons—makes for a charming homemade gift that’s as cute as it is delicious.
Make Ahead and Storage
Storing Leftovers
I’ve found that these sugar cookies keep best when stored in an airtight container at room temperature for up to 3-4 days. The frosting and coconut stay fresh, and the marshmallows hold their fluff if you don’t stack too many on top of each other. Adding parchment paper between layers helps avoid smudged decorations.
Freezing
If you want to make Santa Sugar Cookies Recipe ahead of time, I recommend freezing the plain sugar cookies before decorating. You can thaw and decorate them later, which keeps the candy eyes and marshmallows looking fresh. Freezing fully decorated cookies is trickier because marshmallows can get a bit hard, but if you wrap them individually in plastic wrap and then freeze, they thaw well for a quick snack.
Reheating
Since these cookies are best enjoyed fresh, I usually eat leftovers at room temperature. If you want to warm them slightly, pop them in the microwave for about 5 seconds—but beware, the marshmallows might get gooey fast. I prefer them cool so the frosting and coconut stay intact.
FAQs
-
Can I make the Santa Sugar Cookies Recipe using homemade sugar cookies?
Absolutely! While this recipe uses store-bought sugar cookies for convenience, homemade sugar cookies work beautifully too. Just ensure your cookies are completely cooled before decorating to avoid melting the frosting and decorations.
-
What can I substitute for the candy eyes if I can’t find them?
If you can’t find candy eyes, small chocolate chips or mini white chocolate chips work well. You can also use a dot of frosting and a tiny sprinkle of edible black pearls to mimic eyes.
-
How do I keep the marshmallows from falling off?
Using a small dab of frosting underneath the marshmallow acts like glue and keeps it firmly attached. For extra security, chill your cookies for a few minutes after assembling.
-
Can I prepare these cookies for a holiday party ahead of time?
Yes! You can bake or buy the sugar cookies and make decorations a day in advance. Just decorate on the day of the party for the freshest look—especially for the marshmallows which look best freshly placed.
Final Thoughts
This Santa Sugar Cookies Recipe holds a special place in my holiday baking playlist because it combines simplicity with so much joy. Whether you’re making these with kids, preparing for a last-minute party, or just craving something cute and sweet, these cookies deliver every single time. Give this recipe a whirl—you’ll end up with smiles, sweet memories, and of course, Santas on your cookie plate that everyone will be talking about.
Print
Santa Sugar Cookies Recipe
- Prep Time: 5 min
- Cook Time: 0 min
- Total Time: 15 min
- Yield: 12 cookies
- Category: Dessert
- Method: No-Cook
- Cuisine: American
Description
These festive Santa Sugar Cookies are a delightful and easy holiday treat featuring store-bought sugar cookies decorated with creamy vanilla frosting, candy eyes, cinnamon candies, red sugar sprinkles, shredded coconut, and miniature marshmallows. Perfect for holiday parties or a fun baking activity with kids, these cookies bring a joyful and whimsical Santa Claus design to your holiday dessert table.
Ingredients
Base
- 12 store-bought sugar cookies
Frosting
- 1 can (16 oz) Betty Crocker™ Rich & Creamy Frosting Vanilla
Decorations
- 24 candy eyes
- 12 cinnamon imperial candies
- Red sugar sprinkles, as needed
- Approximately 1/4 cup sweetened shredded coconut
- 12 miniature marshmallows
- Black edible marker, for drawing
Instructions
- Attach eyes and nose: Using a small knife or a toothpick dipped in frosting, carefully attach 2 candy eyes and 1 cinnamon imperial candy to the top of each sugar cookie to form Santa’s eyes and nose.
- Frost the top portion: Spread vanilla frosting evenly over the top third of each cookie, creating a smooth base layer for decoration.
- Add red sugar sprinkles: Gently shake red sugar sprinkles on top of the frosted area, leaving a neat line of white frosting visible to mimic Santa’s hat trim.
- Frost the bottom portion: Apply frosting to the bottom third of each cookie, preparing the surface to hold the coconut for Santa’s beard.
- Apply shredded coconut beard: Press sweetened shredded coconut onto the frosting on the bottom third of the cookie to create Santa’s fluffy beard texture.
- Add marshmallow pom-pom: Attach one miniature marshmallow to the top of the cookie as Santa’s hat pom-pom, securing it gently with frosting if necessary.
- Draw Santa’s smile: Use a black edible marker to carefully draw a smiling mouth on each cookie to complete Santa’s cheerful face.
Notes
- You can substitute store-bought sugar cookies with your favorite homemade recipe if desired.
- For best results, chill cookies briefly after decorating to help set the frosting and keep attachments secure.
- Black edible markers are available at cake decorating or craft stores; do not use regular markers as they are not food safe.
- Customize by adding other festive sprinkles or small candies as accents.
Nutrition
- Serving Size: 1 cookie
- Calories: 150
- Sugar: 18g
- Sodium: 90mg
- Fat: 6g
- Saturated Fat: 4g
- Unsaturated Fat: 2g
- Trans Fat: 0g
- Carbohydrates: 24g
- Fiber: 0.5g
- Protein: 1g
- Cholesterol: 5mg

