
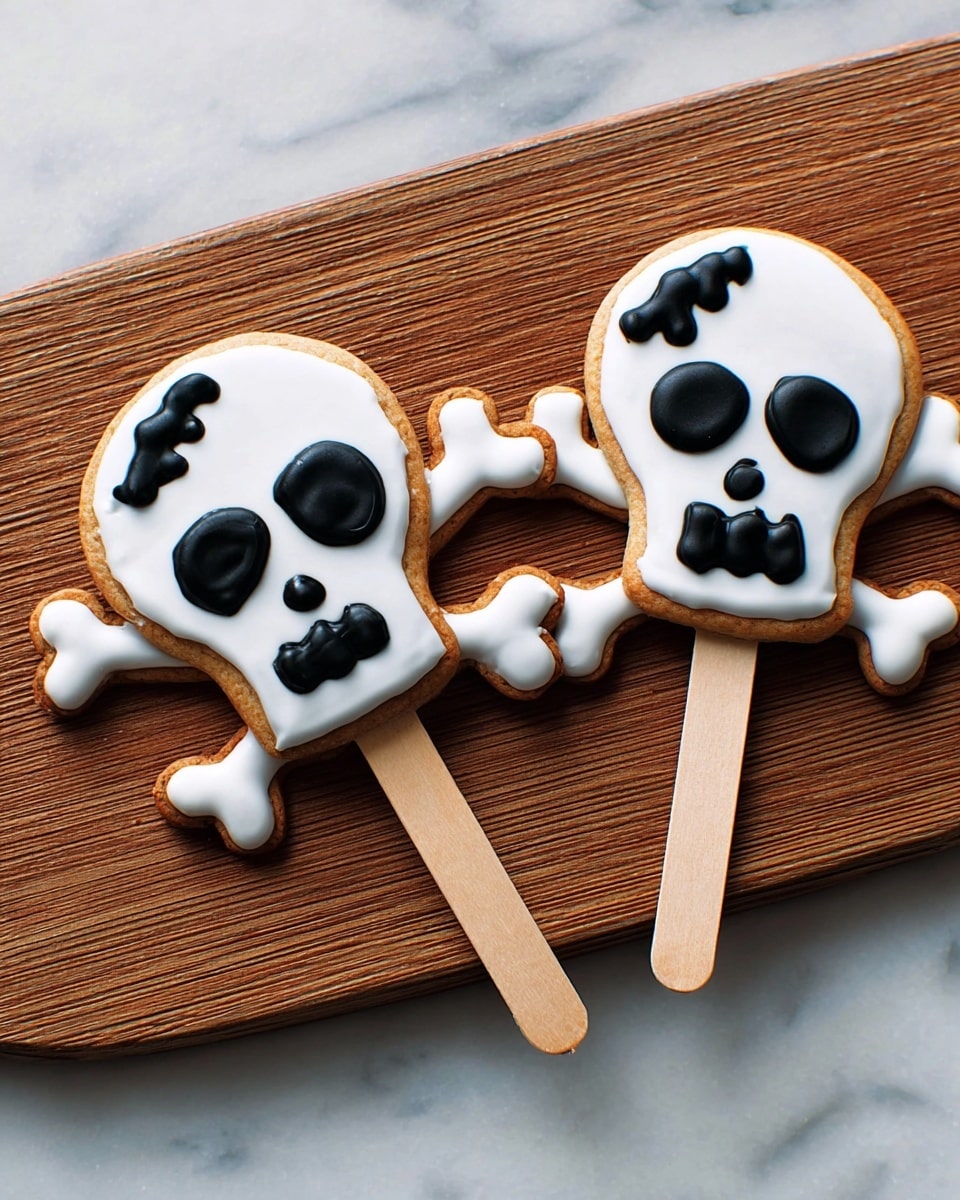
If you’re looking for a fun, spooky treat that’s absolutely irresistible, then you’re going to adore this Skull and Crossbones Cookie Pops Recipe. It’s perfect for Halloween parties, pirate-themed gatherings, or just whenever you want something playful and delicious. I absolutely love how these cookie pops look and how easy they are to make – plus, decorating them is half the fun! Keep reading, and I’ll walk you through every step to help you nail these festive treats.
Why You’ll Love This Recipe
- Easy to Make: Using a cookie mix saves time without sacrificing flavor or texture.
- Festive and Fun: The skull and crossbones design brings a playful spooky vibe to any occasion.
- Perfect for Decorating: White and black icing let you get creative with your designs.
- Kid-Friendly Activity: Great for baking and decorating with the little ones.

Ingredients You’ll Need
The ingredients here come together beautifully to create a perfectly sweet, slightly crisp cookie that’s a dream to decorate. I recommend grabbing quality decorating icings – Betty Crocker’s pouch icing is my go-to because it’s thick and easy to pipe, which helps the skull and crossbones really pop.
- Betty Crocker™ Sugar Cookie Mix: The base of your cookies, this mix keeps things simple without compromising taste.
- Flour, butter, and egg: These help you bring the cookie dough to life; make sure to follow the pouch instructions for best results.
- Craft sticks (flat wooden sticks with round ends): These turn your cookies into pops, perfect for holding and gifting.
- White decorating cookie icing: Use this for the base of your decorating—trust me, it looks awesome against the cookie’s color.
- Black decorating cookie icing: For the skull and crossbones details, black icing makes all the difference.
Variations
I love switching up these Skull and Crossbones Cookie Pops depending on the occasion or my mood. Don’t be afraid to get creative—you’ll find that little tweaks can keep the recipe fresh and exciting.
- Gluten-Free Variation: I swapped the cookie mix for a gluten-free version once, and it made these pops accessible for my friends with gluten sensitivities without losing that classic cookie taste.
- Colorful Icing: I’ve added a pop of red or green icing accents to create festive holiday themes, which my kids adored.
- Chocolate Cookie Base: Replacing sugar cookie mix with chocolate cookie mix adds a rich twist and pairs beautifully with the black and white decorations.
How to Make Skull and Crossbones Cookie Pops Recipe
Step 1: Make Your Dough and Chill
Start by mixing your cookie mix, the flour called for on the pouch, butter, and egg in a medium bowl. This is where I often pause to scrape down the bowl – you want everything well combined but not overworked. Once your dough forms, shape it into a ball and gently flatten it. Wrapping it tightly in plastic wrap and popping it into the fridge for at least an hour really helps it firm up, which makes rolling and cutting the shapes so much easier. I discovered this trick when my dough was too sticky to handle the first time!
Step 2: Roll, Cut, and Stick
Preheat your oven to 375°F. On a lightly floured surface, roll out that chilled dough to about 1/4-inch thickness—thin enough to bake nicely but thick enough to hold the shape. Grab your 3-inch skull and crossbones cookie cutter and punch out as many shapes as you can. Here’s a little tip for you: to keep your cookie pops popping, insert the craft stick halfway through the center of each unbaked cookie. This helps the stick ‘bake in’ and keeps your pops sturdy without breaking later. Be sure to space them at least 2 inches apart on an ungreased cookie sheet so they don’t spread into each other.
Step 3: Bake and Cool
Bake your cookies for 8 to 10 minutes, or until the edges are a lovely golden brown. It’s easy to let these get too dark, so keep a close eye toward the end. Once out of the oven, let them cool on the sheet for about 5 minutes before transferring to a cooling rack. This prevents the bottom from getting soggy. Patience here pays off, because once they’re completely cool, they’re ready for the fun part: decorating!
Step 4: Decorate Your Masterpieces
I love using white icing as the base to highlight the cookie’s shape. Pipe it on smoothly, then let it set for a few minutes. Next, switch to the black icing to add the skull and crossbones details – eyes, nose, and those classic crossed bones. If you want to get extra fancy, use toothpicks to help with fine details or blend colors slightly. Let your decorated cookie pops stand until the icing sets firmly, which might take 30 minutes or so depending on your kitchen’s humidity.
Pro Tips for Making Skull and Crossbones Cookie Pops Recipe
- Keep Dough Chilled: Chilling the dough for at least an hour keeps it firm and prevents spreading while baking.
- Insert Sticks Before Baking: This secures the craft sticks in the cookie, so they don’t pop out while decorating.
- Use Piping Bags or Squeeze Bottles: They give you much better control when creating those skull and crossbones details.
- Be Patient With Icing: Let the white icing set before adding black accents to avoid colors bleeding into each other.
How to Serve Skull and Crossbones Cookie Pops Recipe

Garnishes
I usually keep garnishing simple because the decorated icing really shines on these cookie pops. But sprinkling a tiny bit of edible silver glitter or sugar pearls can add an extra “wow” factor whenever I want to jazz things up. It’s a small touch that makes them party-ready.
Side Dishes
These cookie pops are pretty sweet on their own, so I often pair them with a light drink like sparkling apple cider or some creamy hot chocolate. If you’re serving at a Halloween bash, they also go great alongside popcorn or mini sandwiches for a balanced spread.
Creative Ways to Present
One time, I arranged these cookie pops standing upright in a black foam block decorated like a treasure chest—it was so cute and totally fit a pirate theme! Another time, I wrapped each pop in clear cellophane tied with a ribbon and placed them in mason jars as party favors. Presentation really amps up the fun and makes the effort feel extra special.
Make Ahead and Storage
Storing Leftovers
After decorating, I store leftover cookie pops in an airtight container at room temperature for up to 3 days. Keeping them away from humidity preserves their crispness and keeps the icing nice and firm. If it’s a humid day, I like popping them in a single layer so none of the icing touches and smudges.
Freezing
I tried freezing these cookie pops once and found it works best to freeze before decorating. Wrap the baked and cooled cookies individually in plastic wrap and place them in a freezer-safe bag. When ready to use, thaw at room temperature and then decorate. Freezing after decorating tends to affect the icing’s texture.
Reheating
Reheating these isn’t usually necessary since they’re best served at room temp. But if you want a slightly warm cookie, I recommend gently warming them in a low oven (around 300°F) for just a few minutes. Just avoid microwaving—it can soften the icing and change the texture.
FAQs
-
Can I make Skull and Crossbones Cookie Pops Recipe without a cookie cutter?
Absolutely! If you don’t have a skull and crossbones cutter, you can use a plain round cutter or hand-cut the shapes with a knife. The cookie pops will still taste delicious even if the shape isn’t perfect. Just be sure to insert the craft sticks well before baking.
-
How do I prevent the icing from smudging while decorating?
Give the white icing base enough time to set before adding black details—that usually takes about 15-30 minutes depending on humidity. Using piping bags with small tips also gives you more control to avoid smudging.
-
Can I use homemade sugar cookie dough for this recipe?
Yes! While the recipe is designed around Betty Crocker™ Sugar Cookie Mix for convenience, any sturdy sugar cookie dough that holds shape well will work great for these pops.
-
How should I store decorated cookie pops if I’m making them ahead?
Store them in an airtight container in a cool, dry place for up to 3 days. If you’d like, you can layer parchment or wax paper between the cookie pops to prevent icing from sticking.
Final Thoughts
Honestly, the Skull and Crossbones Cookie Pops Recipe has become one of my favorite go-to festive treats. It’s easy enough that I don’t dread making them, but the results look impressive enough to wow guests. I love sharing this recipe because it’s not just about the cookies, but the fun of decorating and celebrating together. So next time you want a sweet and spooky project, grab that cookie mix, your favorite skull cutter, and let’s get baking—I promise you’ll fall in love with these cookie pops just like I did!
Print
Skull and Crossbones Cookie Pops Recipe
- Prep Time: 45 min
- Cook Time: 10 min
- Total Time: 2 hr 25 min
- Yield: 18 cookie pops
- Category: Dessert
- Method: Baking
- Cuisine: American
Description
These Skull and Crossbones Cookie Pops are fun and festive treats perfect for Halloween or pirate-themed parties. Made with Betty Crocker Sugar Cookie Mix, these cookies are rolled out, cut into spooky skull and crossbones shapes, baked to golden perfection, and creatively decorated with white and black icing on a stick for an easy-to-handle pop.
Ingredients
Cookie Dough
- 1 pouch (17.5 oz) Betty Crocker™ Sugar Cookie Mix
- Flour, for rolling
- Butter, as called for on cookie mix pouch
- Egg, as called for on cookie mix pouch
Decorations
- 18 craft sticks (flat wooden sticks with round ends)
- 2 pouches (7 oz each) Betty Crocker™ Decorating Cookie Icing, white
- 1 pouch (7 oz) Betty Crocker™ Decorating Cookie Icing, black
Instructions
- Prepare the Dough: In a medium bowl, stir together the cookie mix, flour, butter, and egg until a dough forms. Shape the dough into a ball, then flatten slightly. Wrap the dough in plastic wrap and refrigerate for 1 hour or until firm.
- Roll and Cut Cookies: Preheat your oven to 375°F. On a lightly floured surface, roll the dough to 1/4-inch thickness. Using a 3-inch skull and crossbones-shaped cookie cutter, cut out the cookies. Place each cutout on an ungreased cookie sheet about 2 inches apart. Insert a craft stick halfway into the center of each cookie to make the cookie pops.
- Bake the Cookies: Bake the cookies for 8 to 10 minutes or until the edges turn golden brown. Once baked, cool on the cookie sheet for 5 minutes, then carefully transfer them to a cooling rack. Allow the cookies to cool completely.
- Decorate: Once cooled, decorate the cookies using the white and black Betty Crocker Decorating Cookie Icing to create the skull and crossbones design. Let the decorated cookies stand until the icing is set and firm.
Notes
- Ensure the dough is well chilled before rolling to prevent sticking and maintain cookie shape.
- Use a lightly floured surface and rolling pin to avoid dough sticking.
- Insert craft sticks carefully to avoid breaking the cookies.
- Allow icing to fully set before packaging or serving to prevent smudging.
- Store cookies in an airtight container to keep them fresh longer.
Nutrition
- Serving Size: 1 cookie pop
- Calories: 150
- Sugar: 12g
- Sodium: 110mg
- Fat: 6g
- Saturated Fat: 3.5g
- Unsaturated Fat: 2g
- Trans Fat: 0g
- Carbohydrates: 22g
- Fiber: 0.5g
- Protein: 1.5g
- Cholesterol: 25mg


