

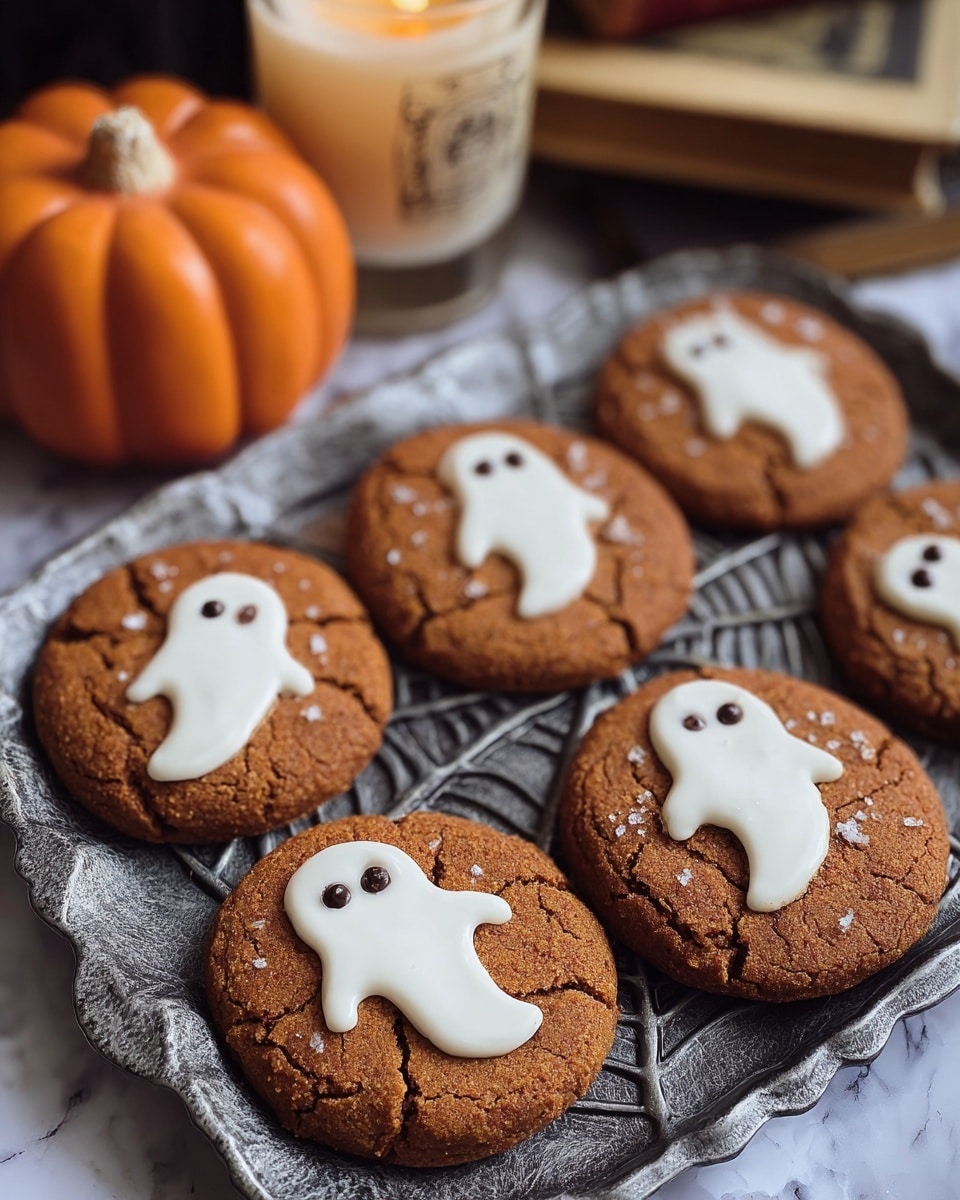
I absolutely love how this Spooky Ghost Brown Butter Pumpkin Cookies Recipe combines the cozy flavors of pumpkin and brown butter with a fun, festive twist. These cookies are perfect for Halloween, fall parties, or just when you want a bite of something spooky and sweet that kids and adults both adore. I discovered this recipe when I wanted to bake something that looked impressive but was actually super simple to pull off.
What makes this Spooky Ghost Brown Butter Pumpkin Cookies Recipe stand out isn’t just the rich, chewy pumpkin cookie base—it’s the whimsical ghost decoration made from white and black chocolate that really steals the show. When you make these, you’ll find that the method of dragging the white chocolate to create ghost shapes is easier than it looks, thanks to a neat little trick I picked up along the way. Plus, your kitchen will smell incredible while these bake!
Why You’ll Love This Recipe
- Chewy Pumpkin Goodness: The brown butter pumpkin cookies are chewy with just the right amount of spice and sweetness.
- Fun, Festive Decoration: The ghost shapes made from melted white chocolate add a playful Halloween vibe effortlessly.
- Easy to Make: You don’t have to be an expert chocolatier—there’s a simple technique that makes decorating a breeze.
- Perfect for Sharing: These cookies always get rave reviews at fall gatherings and make great spooky treats for kids.

Ingredients You’ll Need
All the ingredients work beautifully together to give you that soft pumpkin cookie base with a buttery richness, then topped with festive chocolate ghosts that everyone will love. Here’s a quick overview before you bake your batch!
- Brown Butter and Maple Chewy Pumpkin Cookies: These are the foundation—make sure to follow the base recipe closely for the perfect chewy texture.
- White Chocolate: I prefer good-quality melting wafers for smooth, easy-to-mold ghost shapes without cracking.
- Black Candy Melts: These are perfect for piping the eyes and mouth of the ghosts—melts evenly and holds its shape well.
- Piping Bag: Using a piping bag (or a ziplock with a small cut tip) helps you get precise eyes and mouths on each ghost.
- Medium Cookie Scoop: To get evenly sized cookies that bake consistently.
- Light Colored Baking Pans: They help you monitor the cookies so they don’t over-brown and keep that soft, chewy center.
Variations
I love mixing things up depending on the crowd. Sometimes I add mix-ins or tweak the decorations to keep this Spooky Ghost Brown Butter Pumpkin Cookies Recipe fresh and fun. Feel free to make it your own!
- Spiced Up: Adding a pinch of cayenne or extra cinnamon to the cookie dough gives it a warming kick that my spice-loving friends rave about.
- Dairy-Free Version: Use dairy-free chocolate melts and coconut oil instead of butter in the cookies for a vegan-friendly twist.
- Mini Ghost Cookies: Scoop smaller cookies and decorate tiny ghosts on top for bite-sized treats that are perfect for parties.
- Colored Ghosts: Try using pastel-colored candy melts instead of plain white chocolate for a unique look that’s still festive but less traditional.
How to Make Spooky Ghost Brown Butter Pumpkin Cookies Recipe
Step 1: Bake the Brown Butter Pumpkin Cookies
Get your pumpkin cookie dough ready and scoop it onto light-colored baking pans using a medium cookie scoop for uniform size. Bake these according to the original brown butter pumpkin cookie recipe instructions until just set and lightly golden around the edges. Once baked, the secret is to let them cool completely before decorating—warm cookies will melt your chocolate decorations and turn your ghosts into a gooey mess.
Step 2: Create the White Chocolate Ghosts
Melt your white chocolate in a microwave-safe bowl, stirring every 15 seconds until silky smooth (I love using Ghirardelli melting wafers for this). Place a small dollop of melted white chocolate on each cooled cookie. Then, take the back of a small spoon and gently drag it down to form the ghost’s flowing tail. The trick I learned: use very light pressure to avoid lifting cookie crumbs and ensure a smooth, even ghost shape. If you want, practice this dragging motion on parchment paper first—it really helps build confidence before working on the actual cookies.
Step 3: Add the Ghost’s Eyes and Mouth
While the white chocolate hardens, melt the black candy melts in short bursts in the microwave, stirring in between to keep the texture smooth. Fill a piping bag with the melted black candy, snip a tiny corner, and pipe two small dots for eyes and a little mouth on each ghost. Take your time here—it’s the personality in the little details that really makes these cookies come alive! Let these decorations dry completely before moving or stacking.
Pro Tips for Making Spooky Ghost Brown Butter Pumpkin Cookies Recipe
- Light Pressure Trick: When dragging the white chocolate to form ghosts, a gentle touch keeps the chocolate layer smooth without picking up crumbs.
- Cookie Cooling Time: Always let cookies cool fully before decorating to prevent melting your chocolate decorations.
- Piping Bag Control: Use a sturdier piping bag rather than flimsy ones to get better control on the little eyes and mouth details.
- Practice First: Try your ghost dragging technique on parchment paper before tackling the actual cookies—it really cuts down on mistakes and saves your batch!
How to Serve Spooky Ghost Brown Butter Pumpkin Cookies Recipe
Garnishes
I usually keep it simple with just the ghost faces themselves—they’re so charming on their own! But sometimes I add a light dusting of cinnamon sugar or a sprinkle of edible glitter to give them an extra festive sparkle that my guests absolutely love.
Side Dishes
These cookies pair amazingly with warm drinks like spiced chai tea, pumpkin spice latte, or a cozy cup of hot apple cider. I often serve them alongside a little cheese board for fall gatherings—the sweet and savory combo is a crowd-pleaser every time.
Creative Ways to Present
One fun way I serve these is on a Halloween-themed platter surrounded by mini pumpkins and autumn leaves for that seasonal vibe. For kids’ parties, I’ve also set up a “decorate-your-own-ghost” station allowing little hands to pipe eyes and mouths, turning this into an interactive activity everyone enjoys.
Make Ahead and Storage
Storing Leftovers
I store leftover cookies in an airtight container at room temperature—they stay soft and chewy for up to 4 days. I like to layer parchment paper between them to avoid the chocolate decorations from sticking or smudging.
Freezing
You can freeze the plain baked cookies before decorating for up to 3 months. Just thaw them fully before adding the white and black chocolate decorations to keep everything looking fresh and tidy.
Reheating
If you want a freshly baked taste, I warm the cookies in a low oven (around 300°F) for 5 minutes. Avoid the microwave here since it can melt your adorable ghost decorations.
FAQs
-
Can I make the ghost decorations ahead of time?
You can melt and pipe the ghosts onto parchment paper ahead of time and let them harden. Then gently transfer each ghost onto cooled cookies after baking, but I find doing them right on the cookie easier to avoid breakage.
-
What if my white chocolate is too thick to drag?
Try warming the chocolate a little longer and stirring well to get a smooth, pourable texture. You can also add a tiny splash of vegetable oil to thin it out slightly, making the dragging easier.
-
How do I prevent cookies from burning during baking?
Using light-colored baking pans helps you see the cookie color clearly so you know when they’re perfectly done. Also, keeping an eye on the edges and testing a cookie for softness will prevent overbaking.
-
Can I substitute candy melts with regular chocolate chips?
Regular chocolate chips can work if melted carefully, but candy melts are formulated to melt smooth and harden with a shiny finish, making them better for decorative details like eyes and mouths.
Final Thoughts
This Spooky Ghost Brown Butter Pumpkin Cookies Recipe is truly one of my favorites to bake during the fall season—it’s a delightful mix of cozy flavors and playful decoration that appeals to everyone. Giving these cookies a try feels like sharing a little Halloween magic right from your own kitchen. I hope you enjoy making and eating them as much as my family and I do; I promise they’re as fun to make as they are to nibble!
Print
Spooky Ghost Brown Butter Pumpkin Cookies Recipe
- Prep Time: 20 minutes
- Cook Time: 15 minutes
- Total Time: 1 hour
- Yield: 12 cookies
- Category: Dessert
- Method: Baking
- Cuisine: American
- Diet: Vegetarian
Description
These Spooky Ghost Brown Butter Pumpkin Cookies combine the rich, nutty flavor of brown butter pumpkin cookies with fun Halloween-themed white chocolate ghost decorations. Perfect for festive fall gatherings, these chewy pumpkin cookies are decorated with melted white chocolate shaped into ghost forms and detailed with black candy melts for eyes and mouths.
Ingredients
Brown Butter and Maple Chewy Pumpkin Cookies
- 1 batch Brown Butter and Maple Chewy Pumpkin Cookies by Butternut Bakery (recipe not included)
For Decorating
- White chocolate (e.g., Ghirardelli melting wafers), melted
- Black candy melts, melted
- Piping bag (or ziplock bag with small cut tip)
Helpful Tools
- Medium cookie scoop
- Light colored baking pans
Instructions
- Bake the Cookies: Bake the Brown Butter and Maple Chewy Pumpkin Cookies according to the original recipe instructions, then allow them to fully cool to room temperature before decorating.
- Melt White Chocolate: Melt your white chocolate using a microwave or double boiler until smooth and free of lumps. Ghirardelli melting wafers are recommended for ease.
- Shape the Ghosts: Using a spoon, place a small dollop of melted white chocolate onto each cooled cookie. With the back of a small spoon, gently drag the chocolate down to create a ghost shape. Practice on parchment paper first to perfect the technique and ensure a smooth application without disturbing the cookie surface.
- Harden White Chocolate: Let the white chocolate completely harden at room temperature or in the refrigerator to set firmly before proceeding to the next step.
- Melt Black Candy Melts: Melt black candy melts in a microwave-safe container until smooth. Pour the melted candy into a piping bag or sturdy ziplock bag and snip a small hole at the tip for detailed piping.
- Pipe Ghost Faces: Pipe small dots of black candy melt on the white chocolate ghost shapes to create eyes and mouths, giving each cookie a cute or spooky expression as desired.
- Dry and Serve: Allow the black candy melts to fully dry and harden. Once set, these spooky ghost pumpkin cookies are ready to serve and enjoy at your Halloween celebrations!
Notes
- Apply very light pressure when shaping ghosts with white chocolate to avoid picking up cookie crumbs and ensure a smooth, uniform chocolate layer.
- Practicing the ghost shape on parchment paper before decorating cookies helps improve the technique and the look of the decorations.
- Ensure cookies are fully cooled before decorating to prevent melting or warping of the chocolate shapes.
Nutrition
- Serving Size: 1 cookie
- Calories: 180
- Sugar: 14g
- Sodium: 120mg
- Fat: 8g
- Saturated Fat: 5g
- Unsaturated Fat: 2g
- Trans Fat: 0g
- Carbohydrates: 24g
- Fiber: 1g
- Protein: 2g
- Cholesterol: 15mg
