

If you’re craving a bite that’s both comforting and packed with flavor, this Sweet Teriyaki Chicken Onigiri Recipe is an absolute must-try. I love this recipe because it strikes the perfect balance between that sticky, savory-sweet glaze and the satisfying chew of perfectly seasoned rice. You’ll find that these handheld rice balls are great for a lunchbox, snack, or even a light dinner. Trust me, once you try making these at home, you’ll want to keep this recipe on speed dial!
Why You’ll Love This Recipe
- Perfect Handmade Snack: Onigiri is comfort food at its finest – portable, filling, and finger-licking good.
- Balanced Flavor Profile: The sweet teriyaki glaze complements the salty, savory chicken for a crave-worthy bite every time.
- Simple Ingredients, Big Impact: You’ll be amazed how pantry staples like soy sauce and mirin turn into a luscious sauce in minutes.
- Fun to Make & Customize: Shape your onigiri any way you like and make them your own with toppings or fillings.

Ingredients You’ll Need
These ingredients come together beautifully to give you an authentic taste of sweet teriyaki chicken in classic Japanese rice balls. When shopping, I always pick good-quality sushi rice because the texture makes all the difference.

- Sushi Rice: Provides that sticky texture perfect for molding into onigiri; rinse well before cooking for fluffiness.
- Salt: Use fine salt to season the rice evenly without gritty bits.
- Furikake: Optional but adds a delicious umami boost, especially when mixed into the rice.
- Boneless Skinless Chicken Meat: I prefer dark meat like drumsticks for juiciness and flavor.
- Soy Sauce: For both marinade and teriyaki sauce—a Japanese pantry staple.
- Sake: Adds a subtle depth to the chicken marinade; if you don’t have it, water works fine.
- Baking Soda: Helps tenderize the chicken so it stays juicy when cooked.
- Cornstarch: For a silky coating on the chicken in the pan.
- Mirin: Sweet rice wine to balance saltiness in the teriyaki glaze.
- Brown Sugar: Adds the sweet kick that makes the teriyaki sauce irresistibly sticky.
- Oil: For cooking the chicken evenly without sticking.
- Minced Garlic: Just a quick sauté to enhance flavor—don’t overcook to avoid bitterness.
- Nori Sheets: Cut into strips to wrap around the finished onigiri; adds texture and that signature seaweed flavor.
Variations
I love mixing things up depending on what I have on hand—and you’ll find that onigiri is such a versatile base. Here are some twists I’ve tried that could inspire your own version.
- Spicy Kick: Add a touch of sriracha or chili flakes into the teriyaki sauce for a bit of heat; my family goes crazy for this version!
- Vegetarian Style: Swap chicken with sautéed shiitake mushrooms and extra furikake—still delicious and satisfying.
- Sesame Crunch: Roll your shaped onigiri lightly in toasted sesame seeds before wrapping with nori; adds great flavor and texture.
- Less Sweet: Adjust the sugar in teriyaki sauce if you prefer a more savory profile; I sometimes cut it by half for a lighter glaze.
How to Make Sweet Teriyaki Chicken Onigiri Recipe
Step 1: Season Your Sushi Rice Perfectly
Once your sushi rice is cooked and still warm, gently fold in half a teaspoon of fine salt and two tablespoons of furikake if you’re using it. I remember the first time I sprinkled furikake only on top of the onigiri after shaping, but mixing it into the rice gives every bite that subtle umami kick. Use a wooden spatula or rice paddle to fold without smashing the rice grains.
Step 2: Marinate the Chicken for Juicy, Flavorful Bites
Cut your boneless skinless chicken into small pieces and toss them with soy sauce, sake (or water), baking soda, and cornstarch in a bowl. Refrigerate this mix for 30 minutes so that the baking soda tenderizes the chicken while the soy-sake blend flavors it deeply. This tenderizing step is a secret I discovered after struggling with dry chicken onigiri fillings.
Step 3: Craft the Perfect Sweet Teriyaki Glaze
While your chicken marinates, mix soy sauce, mirin, and firmly packed brown sugar in a small bowl to form your teriyaki sauce. When your chicken is cooked through in a hot pan with oil, reduce the heat, add minced garlic for just 30 seconds (don’t burn it!), then pour in the sauce. Keep stirring until it thickens into that beautiful sticky glaze. This is where the magic happens—watching the sauce coat each piece like candy.
Step 4: Shape Your Onigiri Like a Pro
Wet your hands to prevent rice from sticking, then scoop about ⅓ cup of seasoned rice into your palm. Create a small well in the center and drop a tablespoon of the teriyaki chicken filling inside. Cover with another ⅓ cup of rice and press gently but firmly into a triangle shape. The best advice I can give is to keep your hands moist and be gentle—you want the onigiri to hold together but not be compressed into a rock. Finally, wrap a strip of nori around each onigiri for that classic finish.
Pro Tips for Making Sweet Teriyaki Chicken Onigiri Recipe
- Wet Your Hands Every Time: This little trick saves you from rice sticking to your palms and helps create neat triangles.
- Don’t Rush the Marinade: Marinating chicken for at least 30 minutes makes it tender and flavorful, so don’t skip this step!
- Watch the Sauce Consistency: The teriyaki glaze should be thick enough to coat chicken without dripping—use medium heat to avoid burning.
- Nori Timing Matters: Wrap the nori just before serving to keep it crisp and flavorful, especially if not eating immediately.
How to Serve Sweet Teriyaki Chicken Onigiri Recipe

Garnishes
My go-to garnish is a sprinkle of toasted sesame seeds on the rice before shaping or on top after the nori wrap; it adds a nutty crunch that’s so satisfying. You can also add a few thinly sliced green onions or a dash of shichimi togarashi for a little spice.
Side Dishes
Pair these onigiri with a simple miso soup or a crisp cucumber salad for a light, well-rounded meal. I’ve found that pickled vegetables on the side bring a bright contrast to the sweet, savory chicken.
Creative Ways to Present
For special occasions, I like making mini onigiri and arranging them in a bento box with colorful veggies, tamagoyaki (Japanese rolled omelet), and fresh fruit—kids and adults alike love this spread. You can even drizzle a little extra teriyaki sauce on top right before serving for that glossy finish.
Make Ahead and Storage
Storing Leftovers
I usually store leftover onigiri in an airtight container in the fridge and try to eat them within a day to keep the rice texture just right. Make sure to wrap them tightly with plastic wrap, especially if you’ve already added the nori.
Freezing
I’ve successfully frozen onigiri by wrapping each one tightly in plastic wrap and placing them in a freezer bag. When you want to eat, thaw overnight in the fridge and reheat gently in a steamer or microwave to revive the rice’s softness without drying it out.
Reheating
Microwaving onigiri wrapped in a damp paper towel helps maintain moisture. I like to heat in 30-second bursts, flipping halfway through to warm evenly. If you want to keep the nori crispy, add it fresh after reheating.
FAQs
-
Can I use brown rice instead of sushi rice for this Sweet Teriyaki Chicken Onigiri Recipe?
Brown rice isn’t ideal because it’s less sticky, which makes shaping onigiri tricky. However, if you prefer a healthier option, you can try mixing brown rice with sushi rice to help it hold together better.
-
How do I keep the onigiri from falling apart?
Wet your hands with water before shaping and press gently but firmly to compact the rice without smashing it. Using freshly cooked warm rice also helps the grains stick together naturally.
-
Can I make the teriyaki sauce ahead of time?
Absolutely! The sauce can be made and stored in the fridge for up to a week. Just reheat it gently before tossing with the chicken to get that perfect glaze.
-
What’s the best way to eat onigiri?
Onigiri is designed as a perfect grab-and-go snack or light meal. Enjoy it with your hands—no utensils needed! Try pairing with tea or a light broth to balance the flavors.
Final Thoughts
This Sweet Teriyaki Chicken Onigiri Recipe quickly became one of my go-to dishes whenever I want something simple yet deeply satisfying. It’s like carrying a little warm hug wherever you go. Whether you’re packing lunch for work, planning a picnic, or just craving a homemade Japanese treat, I hope you enjoy making and sharing these as much as my family and I do. Give it a try—you might just find your new favorite comfort food!
Print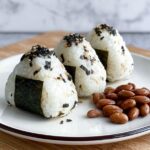
Sweet Teriyaki Chicken Onigiri Recipe
- Prep Time: 35 minutes
- Cook Time: 10 minutes
- Total Time: 45 minutes
- Yield: 4 servings
- Category: Snack
- Method: Stovetop
- Cuisine: Japanese
Description
Delicious Chicken Onigiri, a Japanese rice ball filled with flavorful teriyaki chicken and wrapped with crisp nori. This recipe combines seasoned sushi rice with juicy marinated chicken glazed in a sweet soy-based teriyaki sauce, perfect for a savory snack or light meal.
Ingredients
Rice
- 4 cups cooked sushi rice
- 1/2 teaspoon fine salt
- 2 tablespoons furikake (optional)
Chicken Marinade
- 1/2 pound boneless skinless chicken meat (preferably drumsticks)
- 2 teaspoons soy sauce
- 1 tablespoon sake (or water)
- 1/4 teaspoon baking soda
- 1 teaspoon cornstarch
Teriyaki Sauce
- 1 1/2 tablespoons soy sauce
- 1 tablespoon mirin
- 1 tablespoon firmly packed brown sugar
The Rest
- 1 tablespoon oil
- 1 tablespoon minced garlic
- 1 sheet nori, cut into small rectangles
Instructions
- Prepare the Rice: After cooking sushi rice, mix in ½ teaspoon of fine salt and 2 tablespoons of furikake for added flavor. You can sprinkle the furikake on the finished onigiri if preferred, but mixing it directly into the rice gives the best flavor distribution.
- Marinate the Chicken: Cut the chicken into small pieces and combine with soy sauce, sake, baking soda, and cornstarch in a bowl. Mix well and refrigerate for 30 minutes to tenderize and flavor the meat.
- Combine Teriyaki Sauce Ingredients: In a small bowl, mix together soy sauce, mirin, and brown sugar until the sugar dissolves to make the teriyaki sauce.
- Cook the Chicken: Heat oil in a large nonstick pan over medium-high heat. Add the marinated chicken pieces and cook for 2-3 minutes until thoroughly cooked.
- Add Garlic and Glaze: Reduce heat to medium, add minced garlic and cook for 30 seconds until fragrant. Pour in the teriyaki sauce mixture, cooking until it thickens and coats the chicken pieces with glaze. Remove from heat.
- Shape the Onigiri: Wet your hands with water to prevent sticking. Scoop ⅓ cup of the seasoned rice into your palm, make a small well or indentation in the center, and add 1 tablespoon of the teriyaki chicken filling. Cover with another ⅓ cup of rice, then gently but firmly shape the rice into a triangle around the filling.
- Wrap and Serve: Wrap each onigiri with a strip of nori for added texture and flavor. Serve immediately or pack for later consumption.
Notes
- Using fine salt helps distribute seasoning evenly throughout the sushi rice.
- Allowing the chicken to marinate with baking soda tenderizes the meat for a softer texture.
- You can substitute sake with water if sake is unavailable.
- Furikake is optional but adds umami and texture to the rice.
- Keep your hands wet when shaping onigiri to prevent rice from sticking.
- These onigiri are best enjoyed the same day to keep nori crisp.
Nutrition
- Serving Size: 1 onigiri
- Calories: 320 kcal
- Sugar: 5 g
- Sodium: 600 mg
- Fat: 7 g
- Saturated Fat: 1.5 g
- Unsaturated Fat: 5 g
- Trans Fat: 0 g
- Carbohydrates: 45 g
- Fiber: 2 g
- Protein: 15 g
- Cholesterol: 45 mg

