

If you’re a caramel and chocolate lover like me, you’re going to flip over this Twix Cookie Cups Recipe. It’s basically all the best parts of a Twix bar, but in a cute, bite-sized cookie cup form that’s perfect for any occasion. When I first made these, my family couldn’t stop raving—and the best part? They’re surprisingly simple to make. Keep reading because I’m going to walk you through every step so you can nail these delicious cookie cups too!
Why You’ll Love This Recipe
- All the classic Twix flavors: You get buttery cookie, smooth caramel, and sweet milk chocolate all in one bite.
- Perfectly portioned treats: These cookie cups are easy to share, serve, and enjoy without any mess.
- Simple ingredients: You probably already have everything in your pantry to whip these up quickly.
- Fun and impressive: They look fancy, but they’re straightforward to make, so you’ll wow guests or family effortlessly.

Ingredients You’ll Need
The ingredients in this Twix Cookie Cups Recipe come together to create a balanced flavor and texture that’s just irresistible. I love using real butter here because it gives the cookie base an amazing richness, while the caramel and chocolate bring that classic candy bar feel to life.

- Salted butter: Using salted butter adds that perfect hint of saltiness that complements the caramel beautifully.
- Granulated sugar: Sweetens the cookie dough and helps it brown nicely during baking.
- Vanilla extract: A little boost of flavor that really rounds out the cookie base.
- Egg white: Helps bind the dough together without adding heaviness.
- All-purpose flour: The foundation for the cookie cups, choose a good quality flour for the best texture.
- Baking powder: Gives the cookies a little lift to get that perfect puff.
- Caramels: Use soft caramels you can melt down for that luscious gooey layer.
- Milk: Added to the caramel to make it smooth and spreadable.
- Milk chocolate chips: For melting and topping the cookie cups with rich, creamy chocolate.
Variations
I love customizing this Twix Cookie Cups Recipe for different occasions or dietary needs. These little cups are surprisingly versatile—you can get creative with toppings or adjust for what you have on hand.
- Salted caramel twist: I sometimes sprinkle a tiny pinch of sea salt on top before the chocolate sets, which amps up the flavor in the most amazing way.
- Dark chocolate version: Swap the milk chocolate chips for dark chocolate if you prefer a less sweet, richer finish—I swear it’s just as addictive.
- Nutty additions: Chopped pecans or almonds sprinkled on top before the chocolate sets add a delightful crunch.
- Gluten-free adaptation: I’ve tried this recipe with a gluten-free flour blend and it works well, just watch baking times as it may vary slightly.
How to Make Twix Cookie Cups Recipe
Step 1: Cream the Butter and Sugar
Start by preheating your oven to 350°F (175°C). Then, cream together the softened salted butter and granulated sugar using a hand mixer or stand mixer. I like to mix it for about 3-4 minutes until it’s fluffy and light—a crucial step to get a tender cookie cup. This little trick really makes a difference in texture, so don’t rush it!
Step 2: Add Egg White and Vanilla
Next, add in the egg white and vanilla extract. Beat everything until it’s well combined and smooth. Using just the egg white keeps the cookie cups from getting too cakey, which I really prefer for this recipe.
Step 3: Mix in Flour and Baking Powder
Now it’s time to add the all-purpose flour and baking powder. Mix on low speed until the dough comes together. If it feels a little crumbly, just keep mixing—it’ll form into a workable dough soon, perfect for rolling out.
Step 4: Roll Out and Cut Cookies
Flour your surface lightly and roll the dough to about 1/4 to 1/2 inch thickness. I like using a round cookie cutter about 2.5 inches wide to cut perfect circles that will hold the caramel filling just right. Transfer the circles to an ungreased baking sheet—no need for greasing because the dough has plenty of butter.
Step 5: Bake and Cool
Bake the cookies for 6-8 minutes until they puff up and lose their glossy shine. This is when you know they’re done—not too brown, just perfectly puffed. Let them rest on a wire rack to cool completely; this step is key because it keeps your cookie cups sturdy for the caramel layer.
Step 6: Make the Caramel Layer
While the cookies cool, melt the unwrapped caramels and milk together in the microwave. Heat in 30-second intervals, stirring each time, until the mixture is smooth and creamy without lumps. I discovered this melting trick prevents your caramel from burning or crystallizing.
Step 7: Spread Caramel on Cookies and Chill
Carefully spoon a few teaspoons of caramel onto each cookie circle and spread it out to almost cover the cookie surface. Then pop them into the fridge for 10-15 minutes so the caramel firms up—this step stops it from oozing out later when you add the chocolate.
Step 8: Melt Chocolate and Finish the Cups
Meanwhile, melt the milk chocolate chips in 30-second bursts in the microwave, stirring between each, until silky smooth. Spread a thin layer of melted chocolate atop each caramel layer. Let the chocolate cool completely and set up before serving. I love how the chocolate hardens just enough to create that satisfying snap when you bite in.
Pro Tips for Making Twix Cookie Cups Recipe
- Room Temperature Butter: Make sure your butter is soft but not melted—this helps the sugar cream properly for a tender cookie.
- Don’t Overbake Cookies: Pull them out as soon as they stop looking glossy; they’ll firm as they cool and stay soft inside.
- Chill After Caramel Layer: Giving the caramel time to set in the fridge prevents it from flooding over when you add the chocolate topping.
- Melting Chocolate Gradually: Microwave in short bursts and stir often to get perfectly smooth chocolate without scorching it.
How to Serve Twix Cookie Cups Recipe

Garnishes
My go-to garnish for these Twix Cookie Cups is a simple sprinkle of flaky sea salt right after spreading the chocolate. It cuts the sweetness perfectly and adds a tiny crunch. Sometimes I drizzle extra melted caramel or even a pinch of crushed pretzels for texture—both add an elegant touch and make them even more crave-worthy.
Side Dishes
These cookie cups are great all on their own, but if you’re serving them at a party, I like to offer fresh fruit like sliced strawberries or a scoop of vanilla ice cream on the side. The fruity freshness and creamy ice cream balance the rich caramel and chocolate wonderfully.
Creative Ways to Present
For special occasions, I’ve arranged Twix Cookie Cups on a tiered dessert stand layered with edible flowers and greens for a stunning display. Another fun idea is to wrap each cookie in a mini cupcake liner and tie with a ribbon—it makes a fantastic homemade party favor or holiday gift.
Make Ahead and Storage
Storing Leftovers
I keep leftover Twix Cookie Cups in an airtight container in the fridge, which keeps them fresh for up to 5 days. Just make sure they’re fully cooled and the chocolate is set before storing, so nothing melts or sticks together. It’s nice knowing I’ve got a quick sweet treat ready when a craving hits.
Freezing
If you want to make these ahead for a party, they freeze beautifully. I place them on a baking sheet to freeze individually first, then transfer to a freezer-safe bag. When thawed in the fridge overnight, they taste just as fresh and delicious.
Reheating
I don’t usually reheat these because they’re best enjoyed chilled or at room temperature. But if you want to soften the caramel a bit, a quick 10-second zap in the microwave does the trick—just watch closely so the chocolate doesn’t melt too much.
FAQs
-
Can I use salted caramels or unsalted butter?
You absolutely can! I typically use salted butter because it balances the sweetness, but if you only have unsalted butter, just add a tiny pinch of salt to the dough. Salted or unsalted caramels are fine too, just be mindful of the overall sweetness and adjust if needed.
-
How do I prevent the caramel from leaking out of the cookie cups?
Chilling the cookies after spreading on the caramel is key. Let it cool in the fridge for at least 10-15 minutes to firm up before topping with chocolate. This creates a barrier that keeps the caramel in place when you serve or store them.
-
Can I make these cookie cups vegan or dairy-free?
While I haven’t tried a fully vegan version myself, you can experiment with dairy-free butter and vegan chocolate chips. For caramel, look for dairy-free or homemade caramel substitutes. Just note that texture and flavor might slightly change.
-
What’s the best way to cut the cookie dough?
I recommend using a round cookie cutter about 2.5 inches wide for portion control and to hold the caramel perfectly. If you don’t have a cutter, a small glass rim works great. Just try to keep all circles as uniform as possible so they bake evenly.
Final Thoughts
This Twix Cookie Cups Recipe is one of those joyful kitchen discoveries that I love sharing with friends because it just hits all the right notes—rich, gooey, chocolatey, and totally comforting. Whether you’re gifting these or keeping them all to yourself (no judgment here!), they bring a little moment of happiness with every bite. I hope you enjoy making them as much as my family and I do. Get ready for some serious sweet tooth satisfied smiles!
Print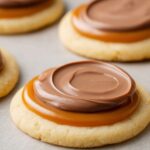
Twix Cookie Cups Recipe
- Prep Time: 10 minutes
- Cook Time: 10 minutes
- Total Time: 40 minutes
- Yield: 24 cookie cups
- Category: Dessert
- Method: Baking
- Cuisine: American
Description
Twix Cookie Cups are a delightful homemade treat combining buttery cookie bases topped with creamy caramel and smooth milk chocolate. Inspired by the classic Twix candy bar, these bite-sized cookie cups offer a perfect balance of rich flavors and textures, making them an irresistible snack or dessert for any occasion.
Ingredients
Cookie Dough
- 1/2 cup (111g) salted butter
- 1/2 cup (115g) granulated sugar
- 1 tsp vanilla extract
- 1 egg white
- 1 1/2 cups (228g) all-purpose flour
- 1 tsp baking powder
Caramel Topping
- 20 caramels, unwrapped
- 1 tbsp milk
Chocolate Topping
- 2 cups (400g) milk chocolate chips
Instructions
- Preheat Oven: Set your oven to 350°F (175°C) to prepare for baking the cookie bases.
- Cream Butter and Sugar: In a mixing bowl, cream together the salted butter and granulated sugar until light and fluffy, creating a smooth base for the dough.
- Add Egg White and Vanilla: Mix in the egg white and vanilla extract until fully combined to add moisture and flavor to the dough.
- Incorporate Dry Ingredients: Add the all-purpose flour and baking powder to the wet mixture, stirring thoroughly until a smooth dough forms.
- Roll and Cut Dough: Roll out the dough to about 1/4 to 1/2 inch thickness on a lightly floured surface. Use a round cookie cutter to cut out circles and transfer them onto an ungreased baking sheet.
- Bake Cookies: Bake the cookie circles in the preheated oven for 6-8 minutes, or until they become puffy and lose their glossy appearance. Remove from oven.
- Cool Cookies: Transfer the baked cookies to a wire rack and allow them to cool completely, which prepares them for the caramel layer.
- Prepare Caramel: Microwave the unwrapped caramels with milk for 1 minute, stirring at the 30-second mark. Continue stirring until the caramel is smooth and creamy.
- Apply Caramel Layer: Spoon a few teaspoons of the warm caramel onto each cooled cookie, spreading it to nearly cover the surface evenly.
- Chill Cookies: Place the caramel-topped cookies in the refrigerator for 10-15 minutes or until the caramel is completely set and cold.
- Melt Chocolate: Melt the milk chocolate chips by microwaving in 30-second intervals, stirring in between, until fully melted and smooth.
- Apply Chocolate Layer: Spread a small amount of melted chocolate over the cold caramel layer on each cookie cup. Allow the chocolate to cool and set before serving.
Notes
- Ensure cookies are fully cooled before adding caramel to prevent melting and sliding.
- Use a silicone baking mat or parchment paper on the baking sheet for easier cleanup.
- Store finished cookie cups in an airtight container in the refrigerator to keep the caramel and chocolate firm.
- You can substitute milk chocolate chips with dark or white chocolate based on preference.
- For easier caramel melting, chop caramels into smaller pieces before microwaving.
Nutrition
- Serving Size: 1 cookie cup
- Calories: 190
- Sugar: 18g
- Sodium: 90mg
- Fat: 10g
- Saturated Fat: 6g
- Unsaturated Fat: 3g
- Trans Fat: 0g
- Carbohydrates: 23g
- Fiber: 1g
- Protein: 2g
- Cholesterol: 15mg
