
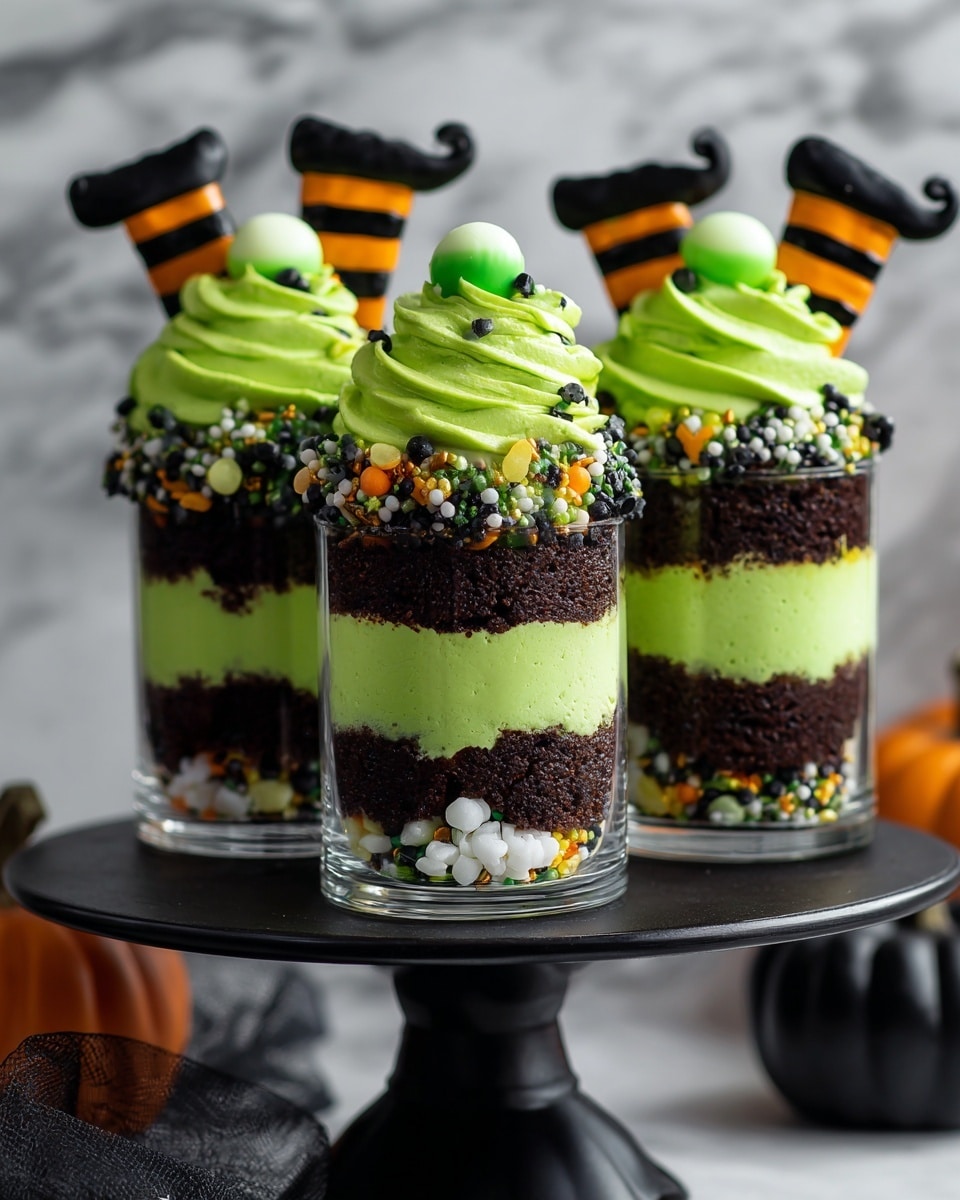
If you’re looking for a show-stopping Halloween treat that’s as fun to make as it is to eat, you’re going to adore this Witches Brew Halloween Cake Jars Recipe. Imagine layers of rich black cocoa cake and vibrant green buttercream, all nestled in adorable little jars, topped with expertly crafted fondant witches’ legs and shoes! I absolutely love how this turns out – it’s spooky, sweet, and totally irresistible. Stick with me, and I’ll show you how to nail every detail so your Halloween party guests will be wowed.
Why You’ll Love This Recipe
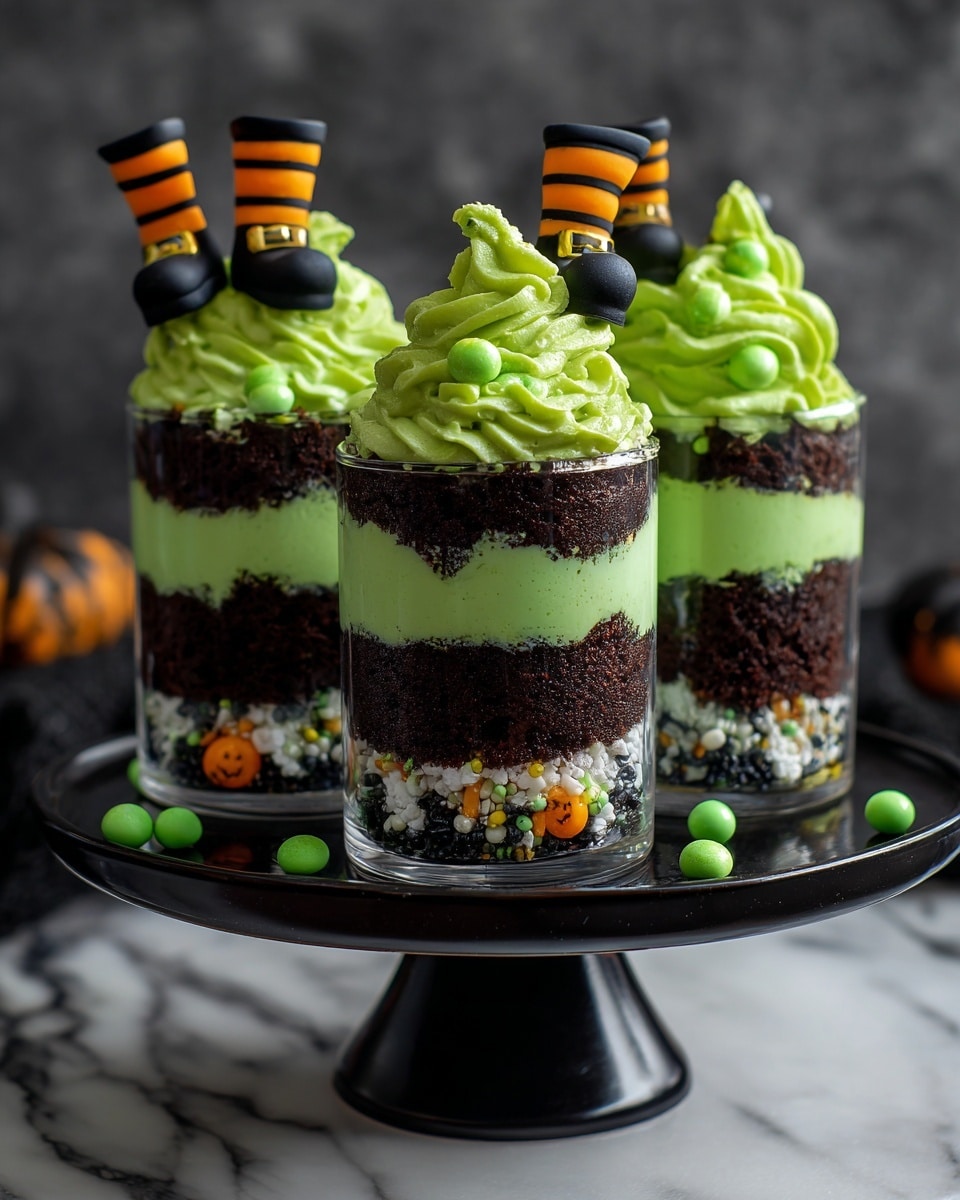
- Perfect Layered Presentation: The individual jars create a spooky, magical effect that’s both festive and practical.
- Fun Fondant Decorations: Crafting the witch legs and shoes adds a creative, hands-on twist that makes this recipe memorable.
- Decadently Moist Cake: The black cocoa powder gives a deep flavor and striking color, delighting both kids and adults alike.
- Customizable Sweetness: The buttercream is smooth and can be adjusted for consistency and color, so it’s just how you like it.

Ingredients You’ll Need
Each element of the Witches Brew Halloween Cake Jars Recipe works together beautifully to balance flavor, texture, and that unmistakable Halloween vibe. From the rich black cocoa cake to the vibrant green buttercream and whimsical fondant decorations, these ingredients come together to create a party centerpiece you’ll want to make every year.
- Self-raising flour: I prefer to use a good-quality self-raising to get that perfect cake rise without fussing over multiple leavening agents.
- Granulated sugar: Regular white sugar keeps the sweetness balanced without overpowering the cocoa.
- Butter: Use salted butter for the frosting, unsalted for the cake — it’s a small trick I learned that really sharpens flavors.
- Eggs: Fresh eggs help keep the cake so fluffy and tender.
- Unsweetened black cocoa powder: This is the star for the deep dark color; don’t substitute with regular cocoa or you’ll miss that intense look and flavor.
- Baking powder: Make sure it’s fresh for optimum lift.
- Salt: Just a touch to balance sweetness and enhance chocolate flavor.
- Milk: Adds moisture and helps keep the batter smooth.
- Vanilla extract: Always real vanilla if you can—it’s magic in the batter and frosting.
- Powdered sugar (icing sugar): For the smooth, silky buttercream that whips up like a dream.
- Electric green food coloring: A few drops go a long way to get that eerie witchy hue.
- Orange and black fondant: Essential for the detailed witch legs and shoes; pick soft and pliable brands for easier shaping.
- CMC powder: This little helper firms up the fondant so your decorations hold their shape perfectly.
- Sprinkles: Adds a playful festive touch to the jar layers.
Variations
While I love sticking to the original Witches Brew Halloween Cake Jars Recipe for its spooky charm, I’ve started playing around with flavors and decorations that make it even more personalized and fun. Don’t hesitate to customize—this recipe welcomes your creativity!
- Gluten-Free Version: I switched to a gluten-free self-raising flour blend once, and the cake still turned out moist and delicious, especially with the cocoa powder enhancing the texture.
- Flavor Twist: Adding a teaspoon of espresso powder to the batter deepens the chocolate flavor, which my coffee-loving friends really enjoyed.
- Dairy-Free Alternative: You can use plant-based butter and milk to make this vegan-friendly. The key is in the ratios and ensuring your fondant is vegan too.
- Fun-Topping Swap: Instead of traditional sprinkles, try crushed candy corn or edible glitter to up the Halloween wow-factor.
How to Make Witches Brew Halloween Cake Jars Recipe
Step 1: Craft the Witch Legs and Shoes
This part is honestly my favorite. Mixing CMC powder into your fondant makes it pliable and easier to shape, which I learned after a couple of failed attempts with dry, cracking legs. Roll your orange fondant into thin 5mm strips, slice them into 10cm lengths for the legs, and wrap thin black fondant stripes on top using just a little water as “glue.” Don’t overdo the water—you want just enough to stick the stripes without making the fondant soggy.
For the shoes, kneading CMC into your black fondant is essential so you can shape those pointy heels and curled toes perfectly. Form each shoe one at a time for the best control. Attaching the shoes to legs with a damp brush and letting them dry overnight creates firm, firm decorations that won’t bend or lose shape.
Step 2: Bake the Deep, Dark Chocolate Cake
Preheat your oven to 170℃ and prep your pan by greasing and flouring it. The creaming method here is key: beat butter and sugar until light and fluffy—that airiness makes the cake super tender. Adding eggs two at a time while beating ensures a smooth batter.
Combine your dry ingredients separately, sift to avoid lumps, then alternate folding them into your wet mix with milk. This gentle folding keeps the batter airy and delicate. Bake for about 45 to 50 minutes, but I always start testing 10 minutes early—watch for a skewer to come out clean and the cake springing back lightly when touched.
Cool completely before moving on; a lukewarm cake will melt your buttercream and decorations, and nobody wants a mess!
Step 3: Whip Up That Vibrant Green Buttercream
Softened salted butter is your base here; cream it until smooth and silky before adding sifted powdered sugar to avoid clouds of sugar dust. This little trick stops a mess and makes your buttercream smoother. Add vanilla extract, then mix in electric green food coloring a few drops at a time until you hit that perfect witchy shade.
If the buttercream feels too stiff to pipe, a touch of milk or cream can loosen it—just go slow so your frosting doesn’t turn runny.
Step 4: Assemble the Spooky Cake Jars
Slice your cooled cake horizontally into two even layers, then use a round cutter the size of your jars to carve 9 circles from each layer. To get the most out of your layers, plan your cuts carefully before you start—it helps prevent wasting cake.
Start each jar with a spoonful of sprinkles at the bottom to add playful color and fill any uneven jar bases. Layer in your cake, pipe buttercream in a ring from the edges to the center, then add more sprinkles along the sides for that eye-catching look from outside the jar. Repeat with the second cake circle and finish with a beautiful swirl of buttercream on top.
Finally, make two holes in the top with a skewer and poke in the witch legs—instant Halloween magic! I learned that letting the fondant legs dry overnight beforehand makes all the difference between sweet decorations and sad bending legs.
Pro Tips for Making Witches Brew Halloween Cake Jars Recipe
- Fondant Handling: I learned that working in a cool, air-conditioned room keeps fondant from getting sticky or saggy—especially important if your kitchen tends to be humid.
- Buttercream Consistency: When piping your frosting, make sure it’s not too stiff by smoothing out lumps with a spatula before adding milk gradually.
- Cake Leveling: Level your cake carefully before cutting rounds so your jars stack neatly without wobbles or gaps.
- Decoration Timing: Always make your fondant legs at least a day ahead to give them time to firm up and avoid bending when inserted into the jar.
How to Serve Witches Brew Halloween Cake Jars Recipe
Garnishes
For garnish, I love adding more sprinkles and even a few edible glitter dusted over the green buttercream—it catches the light and adds to that magical effect. Some mini candy pumpkins or plastic spider rings can be placed around the jar for an extra Halloween punch. If you want to get really creative, a small candy “broomstick” laid beside each jar is a charming touch.
Side Dishes
This recipe shines as the star dessert for a Halloween party, but I do like pairing it with simple sides like pumpkin spice cookies or a bowl of caramel popcorn. The light crunch of popcorn contrasts the moist cake layers perfectly and keeps the spooky vibe going strong.
Creative Ways to Present
Instead of jars, I’ve also tried serving this cake layered in mini clear plastic cups for easy grab-and-go treats at kids’ parties. Using small cauldrons or witch hats as presentation vessels ups the charm factor too. For an elegant touch, tie a thin black ribbon around each jar’s lid or rim—they look cute and festive!
Make Ahead and Storage
Storing Leftovers
I store leftover jars tightly covered in the fridge to keep the frosting firm and the cake moist. They last up to 3 days beautifully this way, but trust me, they rarely last that long in my house! Bringing them to room temperature for 15 minutes before serving really lets the flavors shine.
Freezing
While I don’t recommend freezing the jars fully assembled (the fondant can get soggy), you can freeze the cake slices and unfilled buttercream separately. Thaw them gently overnight in the refrigerator and reassemble just before serving for best freshness.
Reheating
This cake is best enjoyed chilled, so I usually don’t reheat. But if you want to warm a slice, remove the frosting and heat the cake separately in short bursts in a microwave, then reapply buttercream.
FAQs
-
Can I make the Witches Brew Halloween Cake Jars Recipe ahead of time?
Absolutely! I recommend making the fondant legs and shoes at least a day before to let them firm up properly. The cake and buttercream can be made a day ahead too, then assembled just before your Halloween event to keep everything fresh and clean-looking.
-
What if I don’t have black cocoa powder?
Black cocoa powder gives the cake its iconic dark color and a slightly different flavor than regular cocoa. If you can’t get it, you can substitute with Dutch-processed cocoa powder, but your cake will be a bit lighter and less intense in flavor.
-
How do I prevent the fondant legs from bending?
Adding CMC powder to the fondant and letting the legs dry overnight in a cool environment was a game-changer for me. You can also insert thin lollipop sticks inside the fondant legs for extra support if you’re worried about humidity.
-
Can I make these cake jars in advance for a party?
Yes! Assemble the jars up to a few hours before serving and keep them refrigerated. I’d add the fondant witch legs right before guests arrive to keep them looking fresh and avoid any wilting or softening.
Final Thoughts
Honestly, this Witches Brew Halloween Cake Jars Recipe holds a special place in my heart because it combines the joy of baking with festive Halloween spirit in the cutest possible way. I used to struggle with decorating Halloween desserts that looked unique but tasted amazing too, but this recipe checks all the boxes. Whether you’re baking for your family, a party, or just a treat to get you in the spooky mood, I promise you’ll enjoy every bite and every step of making these magical little jars. Give it a go—your Halloween celebrations will never be the same!
Print
Witches Brew Halloween Cake Jars Recipe
- Prep Time: 20 minutes
- Cook Time: 50 minutes
- Total Time: 3 hours 10 minutes
- Yield: 9 jars
- Category: Dessert
- Method: Baking
- Cuisine: Western
Description
Witches Brew Halloween Cake Jars are a whimsical and festive dessert perfect for Halloween celebrations. Featuring layers of rich black cocoa chocolate cake and vibrant green buttercream frosting, these individual cake jars are topped with intricately crafted fondant witch legs and shoes, making them as delightful to look at as they are to eat. With a moist, fluffy cake base and creamy buttercream swirls decorated with colorful sprinkles, these jars bring a fun and spooky charm to your party table.
Ingredients
Cake
- 330 g self raising flour
- 360 g granulated sugar
- 360 g butter
- 6 eggs
- 30 g unsweetened black cocoa powder
- 1½ teaspoon baking powder
- ½ teaspoon salt
- 90 ml milk
- 2 teaspoon vanilla extract
Buttercream Frosting and Decoration
- 400 g salted butter
- 800 g powdered sugar (icing sugar)
- 1¼ teaspoon vanilla extract
- 2 tablespoon milk or cream (optional, if buttercream is too stiff)
- Electric green food coloring (a few drops)
- 250 g orange fondant
- 200 g black fondant
- 1 tablespoon CMC powder
- Sprinkles
Instructions
- The Witches’ Black and Orange Fondant Legs: Knead half a tablespoon of CMC powder into the orange fondant until soft and pliable. Roll it into long strips about 5mm in diameter, then cut into 10cm lengths to make 18 legs. Keep covered to prevent drying. Roll black fondant into thin strips (2-3mm diameter) and use a damp brush to adhere these stripes onto the orange legs, spacing 5 black stripes per leg. Keep the decorated legs covered while working.
- The Black Fondant Shoes: Knead the remaining half tablespoon of CMC into black fondant until soft. Form 18 balls (~2cm diameter), then roll each into a short sausage shape. Pinch one end to form the heel, shape the top part thicker, and curl the other end to form the pointed shoe tip. Use a small tool to create a rounded opening in each shoe large enough for the fondant leg insertion.
- Attaching the Shoes to the Legs: Lightly moisten the inside of each shoe’s opening with a damp brush. Insert the orange leg and gently press to secure. Stand the assembled legs upright to dry and firm overnight.
- The Cake: Preheat oven to 170℃ (338°F). Grease and flour a 9-inch square cake tin. Cream 360g butter with 360g sugar on medium speed for about 2 minutes until light and fluffy, scraping the bowl halfway. Add 6 eggs, two at a time, beating well after each addition. In a separate bowl, whisk together 330g self-rising flour, 1½ tsp baking powder, 30g black cocoa powder, and ½ tsp salt. Sift flour mixture into the creamed mixture in three batches, alternating with 90ml milk, folding gently. Fold in 2 tsp vanilla extract. Pour batter into prepared tin and bake 45-50 minutes. Test doneness with a skewer: it should come out clean. Cool cake completely on a wire rack after removing from tin.
- Buttercream Frosting: Beat 400g salted butter until soft and creamy. Gradually add 800g sifted powdered sugar using a spatula first to minimize dust, then mix with an electric mixer until smooth. Add 1¼ tsp vanilla extract and beat well. If too stiff, add 2 tbsp milk or cream. Mix in a few drops of electric green food coloring until evenly colored. Transfer to a piping bag fitted with a large star tip (1M).
- Assembling the Halloween Cake Jars: Level the cooled cake and slice in half horizontally. Using a round cutter corresponding to the jar size, cut 9 circles from each layer. Spoon sprinkles into the bottom of each jar, pushing them to the sides to make them visible. Place one cake circle into each jar. Pipe green buttercream around the sides, then add more sprinkles on the sides. Add a second cake layer on top, followed by a final swirl of buttercream. Decorate tops with more sprinkles. Use a skewer to make two holes in the buttercream and insert the fondant witch legs to complete the look.
Notes
- Prepare the fondant legs a day ahead to allow them to set firmly and avoid bending when attached to the cake jars.
- A fondant smoother can be used instead of hands to create smooth leg strips without marks.
- In humid environments, fondant may become sticky; adding CMC powder and working in an air-conditioned area helps. Alternatively, use lollipop sticks wrapped with flattened fondant to support the legs.
- Use a damp brush carefully to apply water as glue for fondant; excess water may cause sogginess and color bleeding.
- Keep fondant balls covered while working, kneading again if dry to maintain smoothness.
- The initial shoe takes longer to shape; speed improves with practice.
- Start with small amounts of green gel food coloring as it is concentrated, adding more for desired shade.
- Plan your cake circle cuts carefully to yield 9 pieces per layer.
- Adding sprinkles at the jar bottom is optional but helps fill gaps if the jar base is uneven.
Nutrition
- Serving Size: 1 jar (approx. 220g)
- Calories: 620
- Sugar: 60g
- Sodium: 150mg
- Fat: 38g
- Saturated Fat: 24g
- Unsaturated Fat: 12g
- Trans Fat: 0.3g
- Carbohydrates: 65g
- Fiber: 3g
- Protein: 6g
- Cholesterol: 150mg


